DocsNG Documentation
Last Update: June 2024
What is DocsNG
DocsNG is the ultimate cost-effective solution to effortlessly produce, secure, encrypt and digitally sign documents, utilizing both advanced and qualified certificates. The document generation process is streamlined into three simple steps. Users can readily define data models through an intuitive graphical interface, craft templates using Microsoft Word, and generate documents with ease via the intuitive GUI or the Restful API.
DocsNG offers advanced features such as digital signing and encryption for PDF documents with various assurance levels. It can generate both PDF, DOCX documents and its template engine supports localization for all fields.
In terms of installation, DocsNG can be installed on Linux, Windows, Docker, Google Cloud or AWS, and its administration guide includes instructions for setting up users, templates, authentication and authorisation, and security restrictions.
DocsNG is more than just a document generation tool; it's a codeless database application that empowers users to craft their data models and automatically generate a graphical user interface (GUI). This GUI comes fully equipped with features for creating, searching, editing, and deleting data. It's a seamless solution that simplifies data management without the need for any manual coding. You can leverage CSV files to import your data into the DocsNG database for utilization in document generation.
Additionally, DocsNG keeps track of all user actions, including those of administrators, in an audit log. This ensures that all changes made to the data are recorded, allowing for easy tracking and auditing of the application's usage.
Finally, the generated documents are securely stored in the archive, ensuring convenient retrieval whenever needed.
There are numerous ways to utilize DocsNG. In the following sections, we will begin by elucidating its functionalities, starting with the document generation process.
3 Steps Document Generation With Ease
Step 1: Define your data model
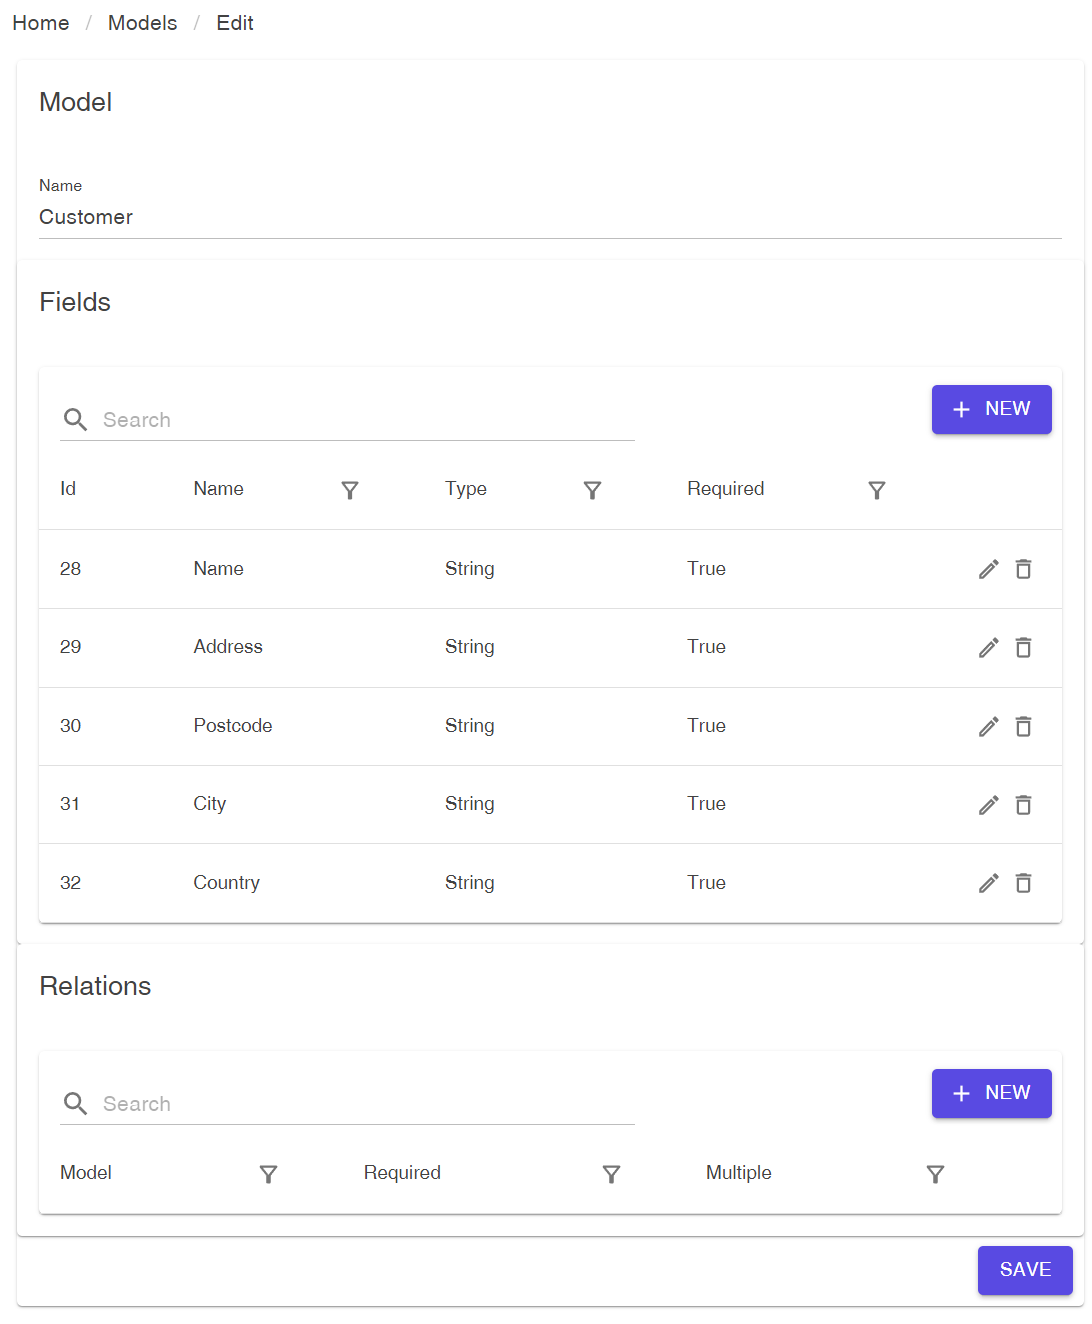
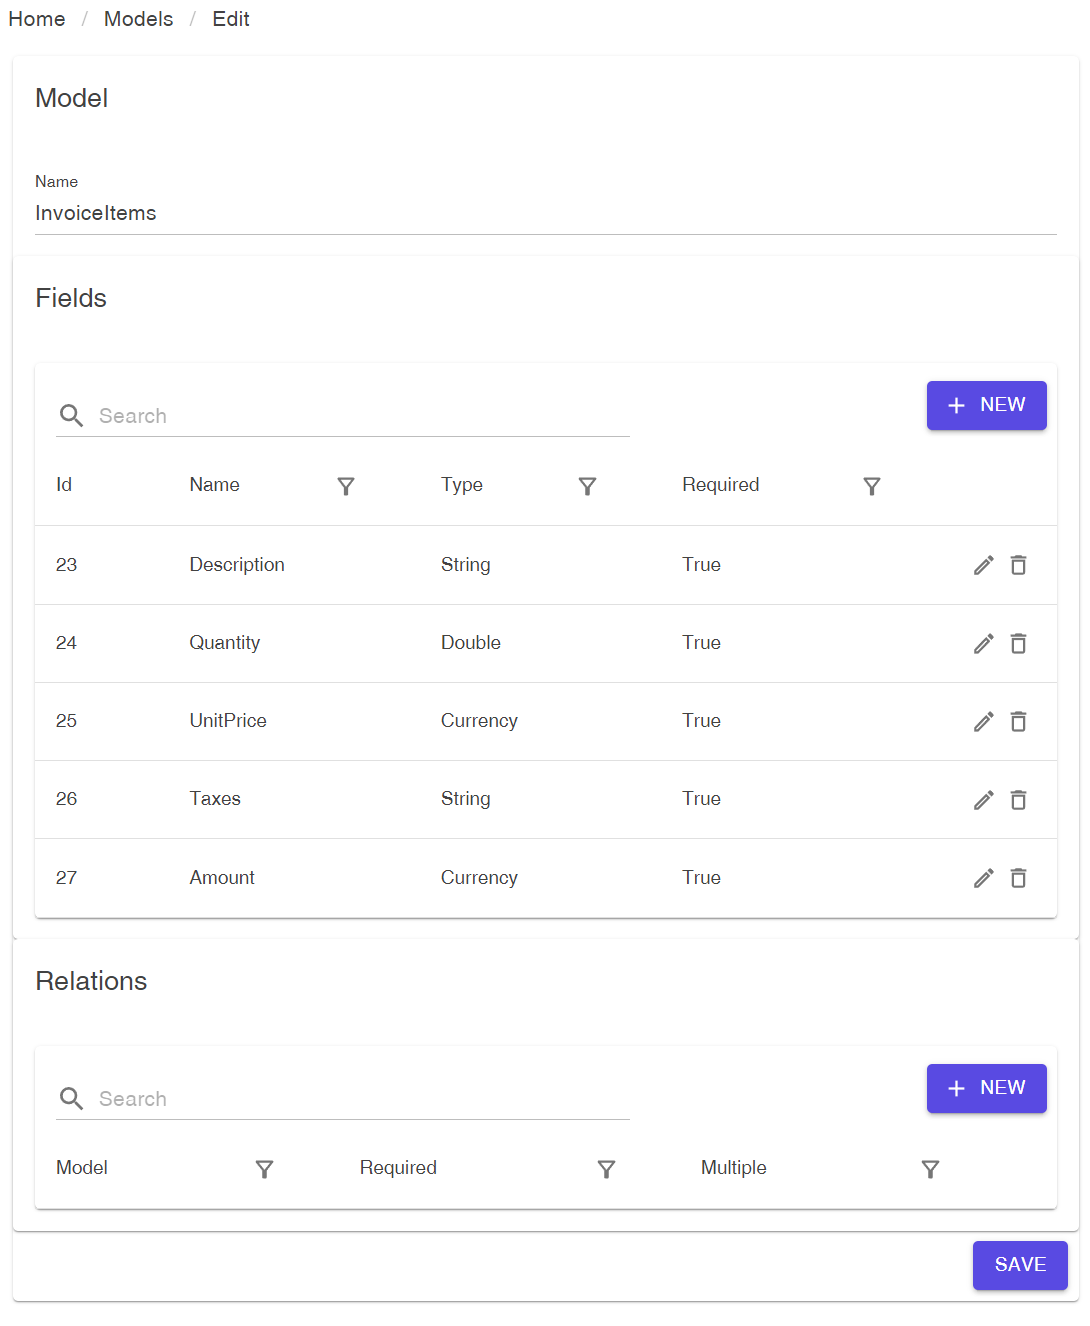
With DocsNG it very easy to define your data model with just a few clicks from intiutive GUI. By simply entering the name of your data model and its corresponding fields. DocsNG automatically generates required screens to enter, search, update, and delete the data. Supported data types are String, Double, Boolean, DateTime, and Currency.
What's more, our data model engine supports n to n relationships between data models, providing even greater flexibility and efficiency. Following example is demonstrate how creation of data models work:
Structure of the Example
We will create an example to create invoices. Although within DocsNG there are many ways to impement an invoice generation. For this example, we will handle it as follows:
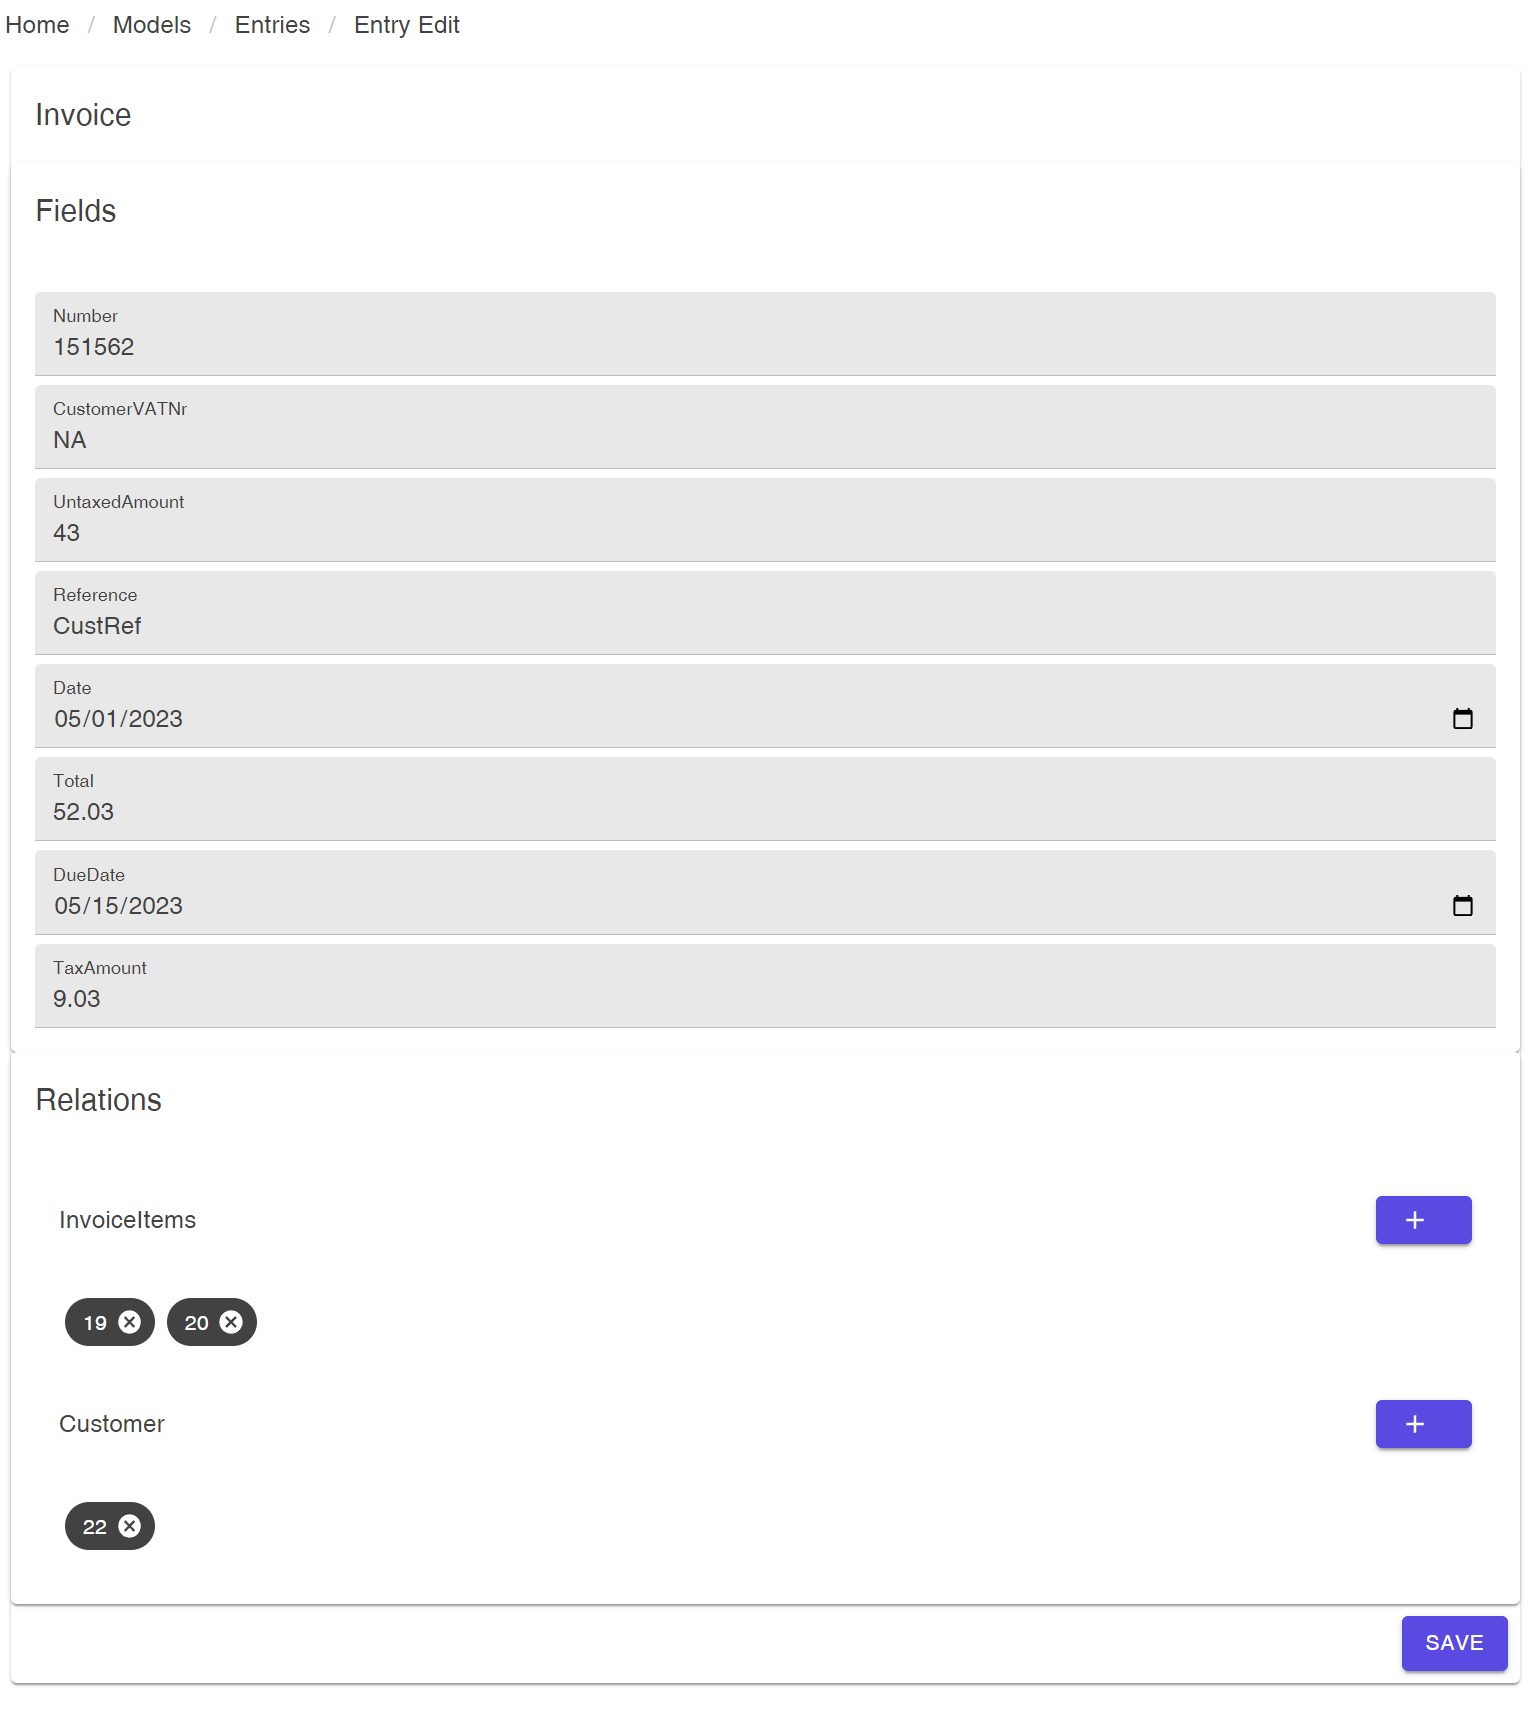
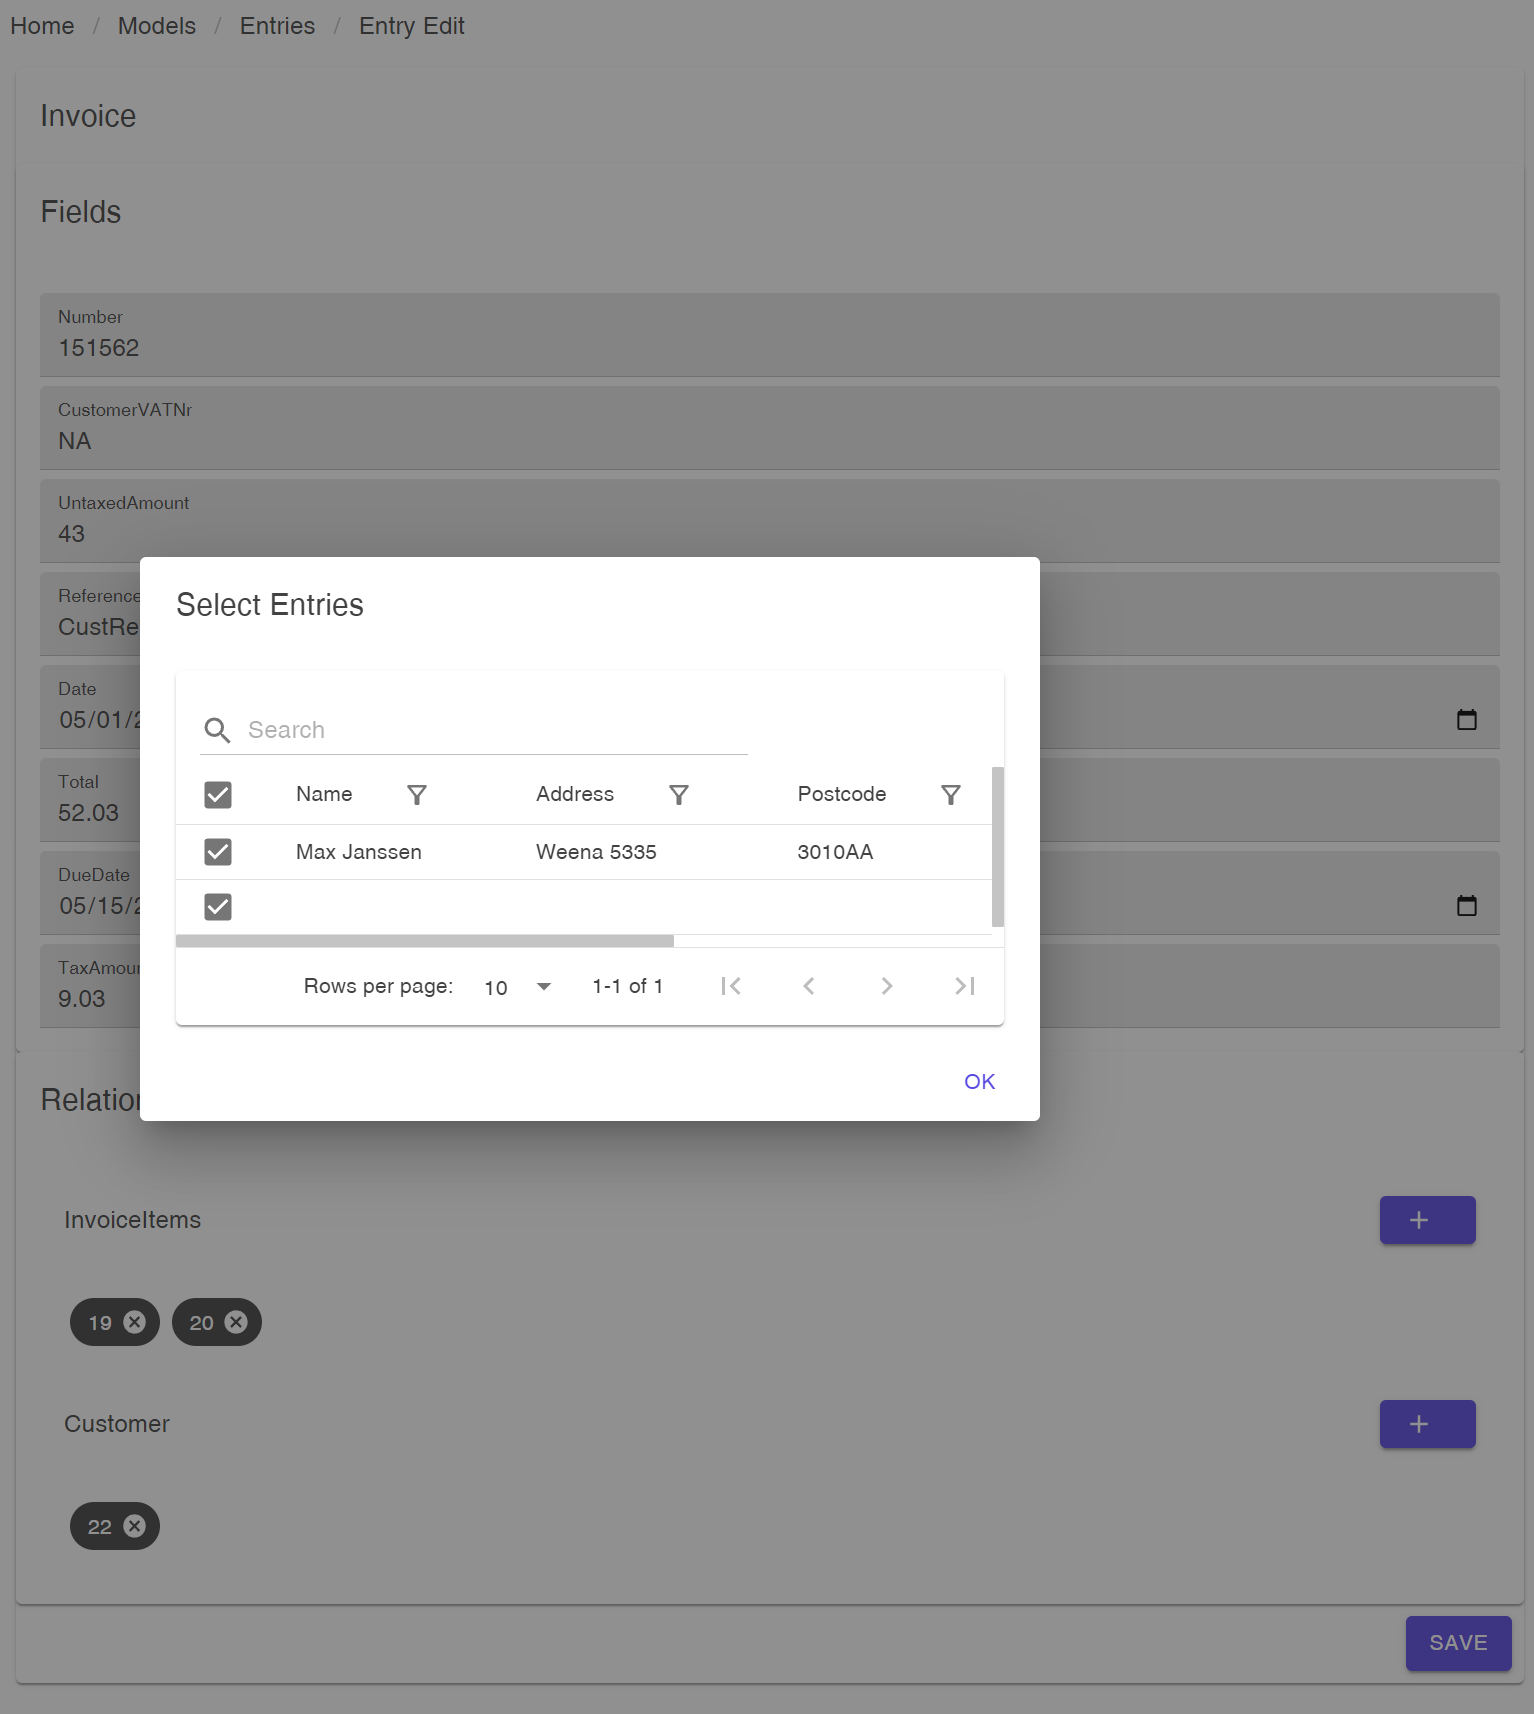
- Each invoice has a customer, so there will be a data model called "Customer".
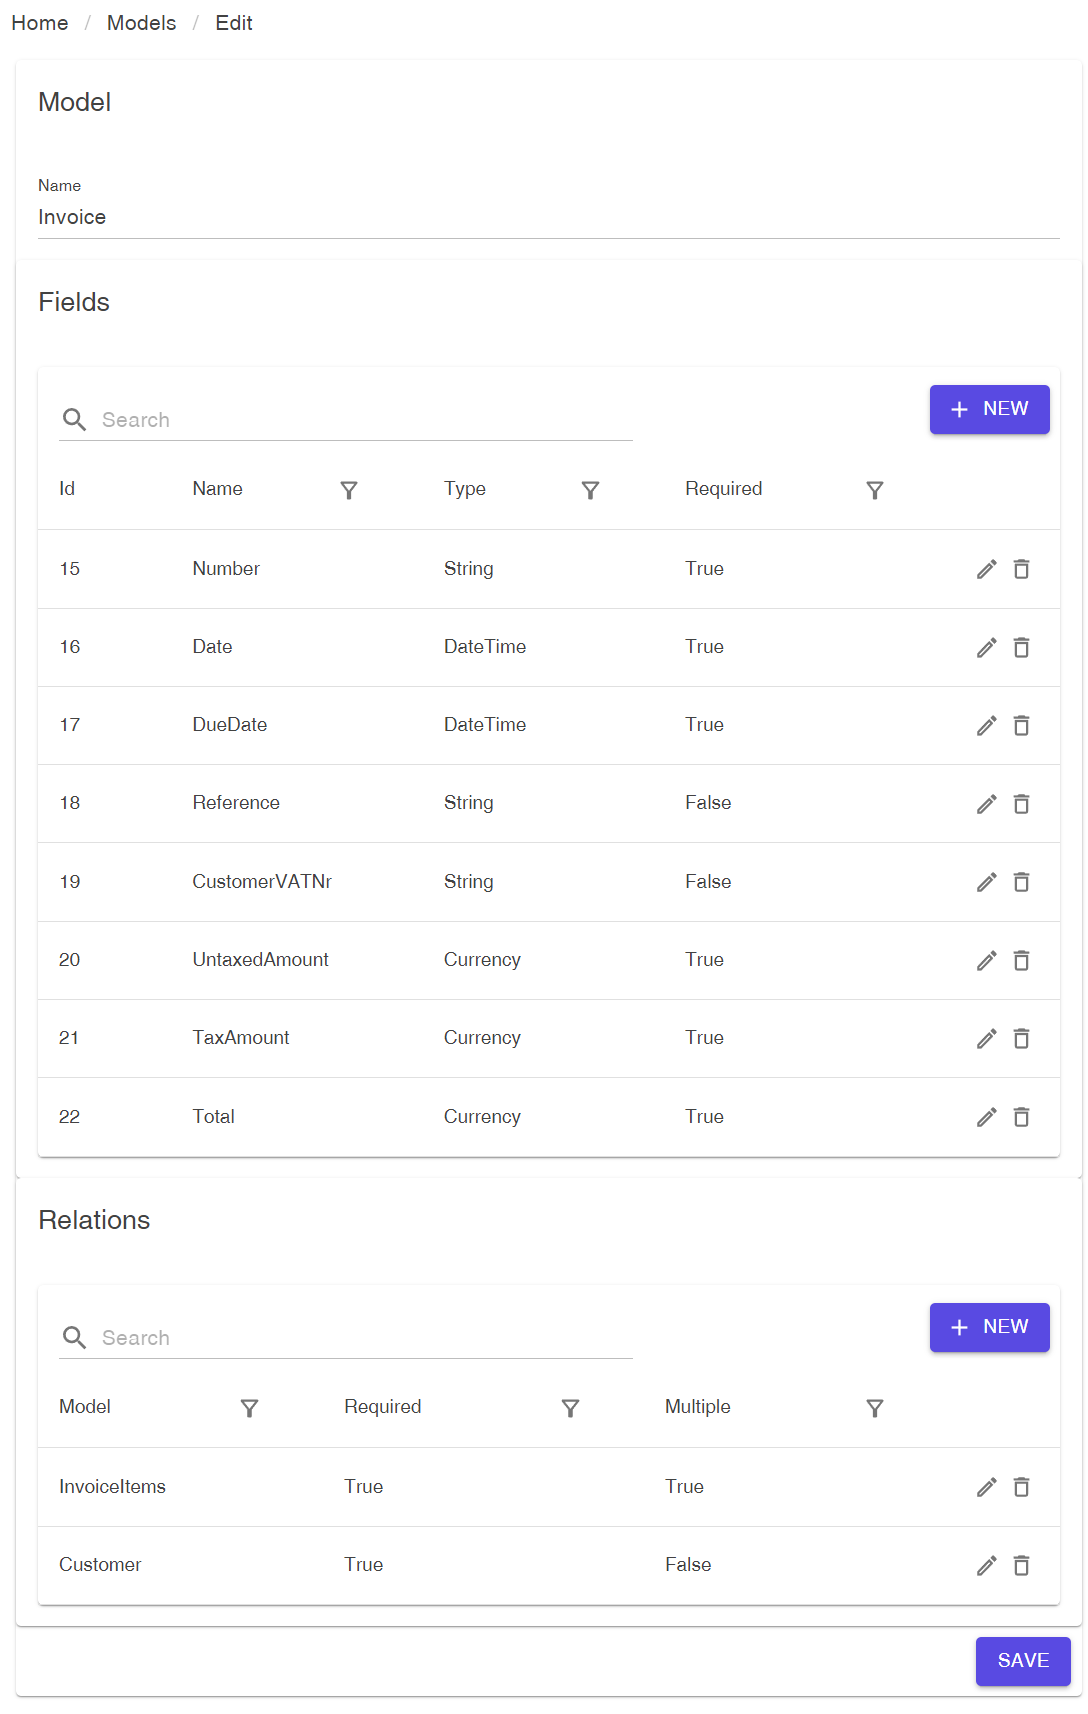
- There will be one data model called "Invoice" which will keep all required data of the invoice (invoice ID, date, total amount, tax amount, etc.).
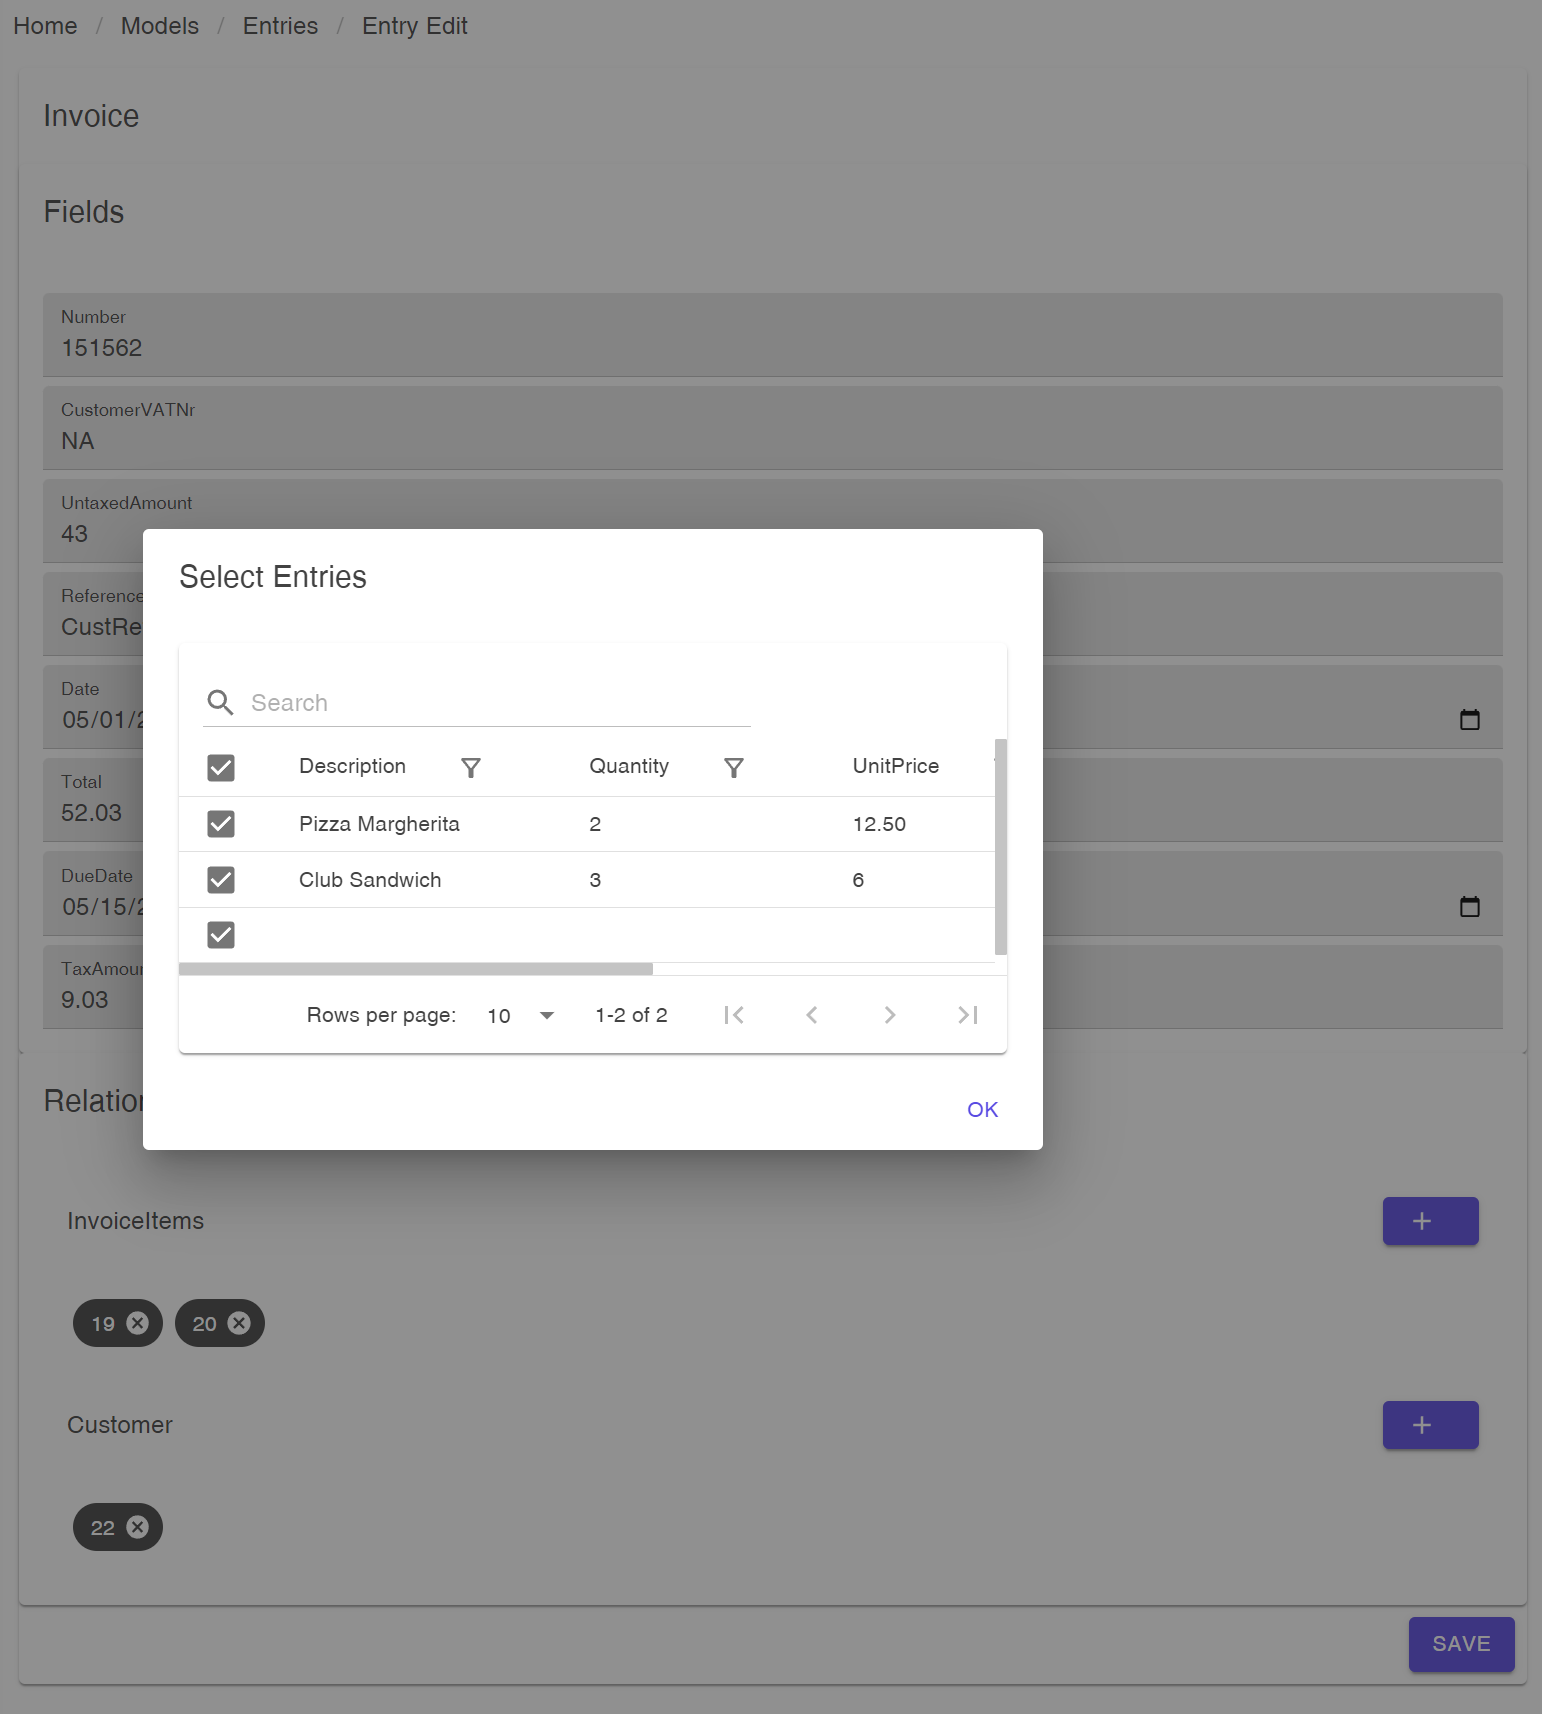
- There will be one data model called "InvoiceItems" which will keep all items included in the invoice.
- Finally, we will connect all models with each other through Invoice model. Each invoice must have 1 customer, many invoice items.
DocsNG utilizes a "Top to Bottom" structure for relationships. In this example, the Invoice acts as the top model, while Customer and InvoiceItems serve as the bottom models. Defining relations in the top model makes it more convenient to create models from the bottom to the top. So, in the scenario described, it's suggested to start by creating the Customer and InvoiceItems models before the Invoice model. However, it's essential to emphasize that the order of creation is a recommendation and not a strict requirement, as data models can be updated at any time.
Customer Model
InvoiceItems Model
Invoice Model
Data Entry Directly From DocsNG
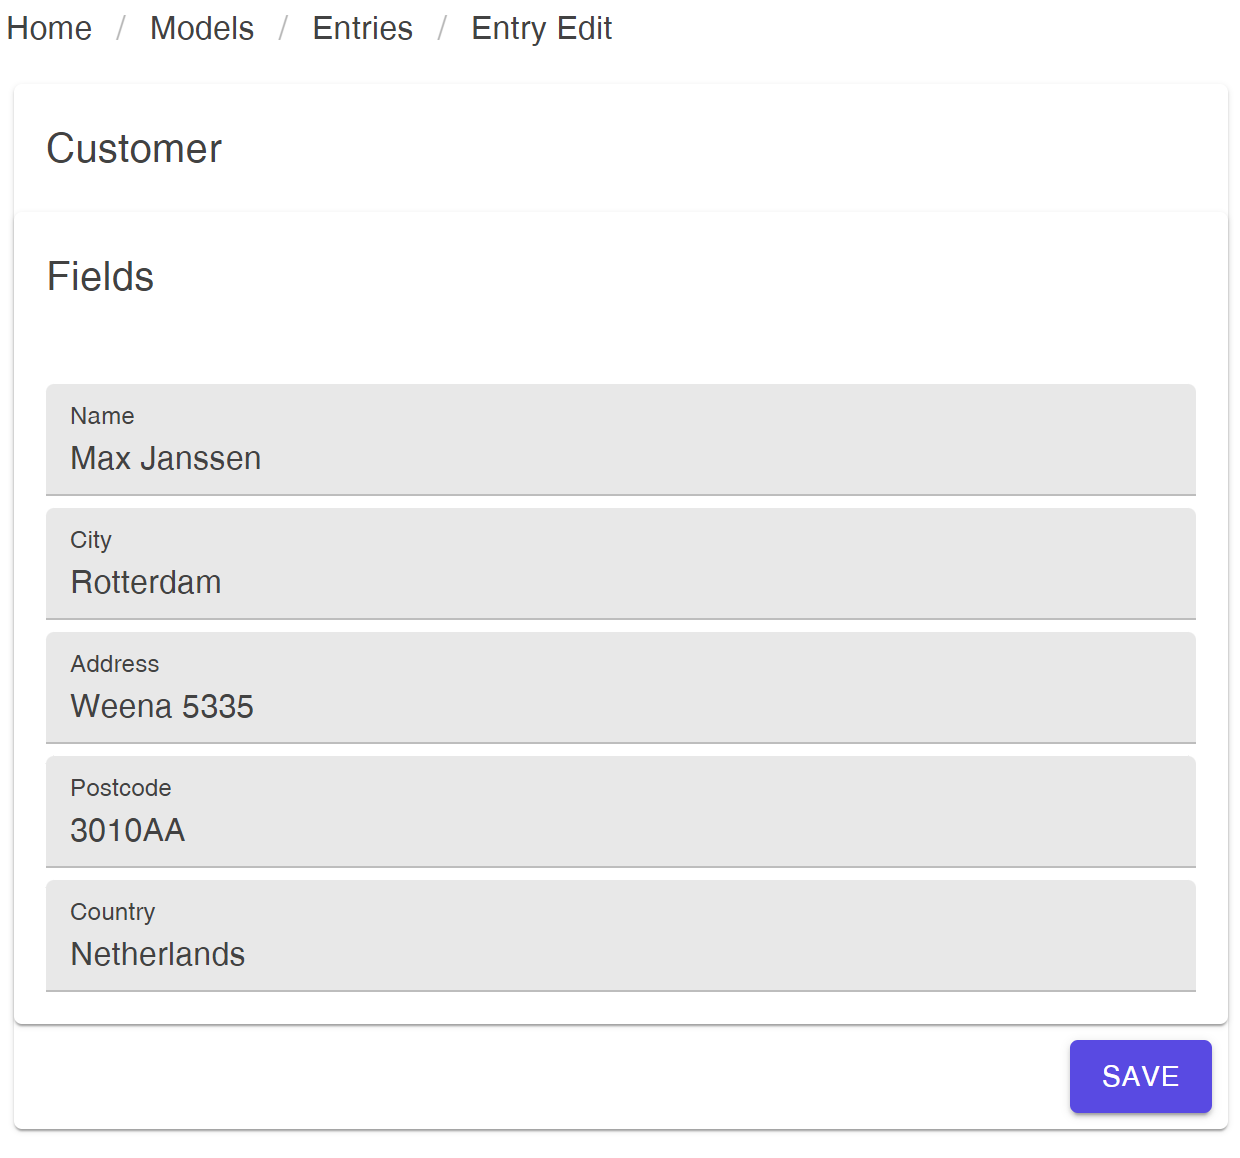

After completing the above steps, we have achieved two key objectives:
- defining all of our required data models, and
- entering the necessary data into DocsNG to be utilized during the document generation process.
Important Note: Entering data in advance is not a prerequisite for generating documents using the Restful API.
Step 2: Create a template using MS Word
With your data model and fields defined, creating a template using Microsoft Word is a breeze with DocsNG. Our software seamlessly integrates with MS Word, allowing you to utilize all of the formatting and layout tools you're already familiar with. By adding placeholder fields for your data, DocsNG will automatically fill in the appropriate data when you generate your documents.
Add fields to a word document
Follow these instructions to add fields to your MS Word document using the Quick Parts menu:
- Open a new or existing document in Microsoft Word.
- Place the cursor where you want to insert the field.
- Click on the "Insert" tab in the ribbon and select "Quick Parts" in the "Text" group.
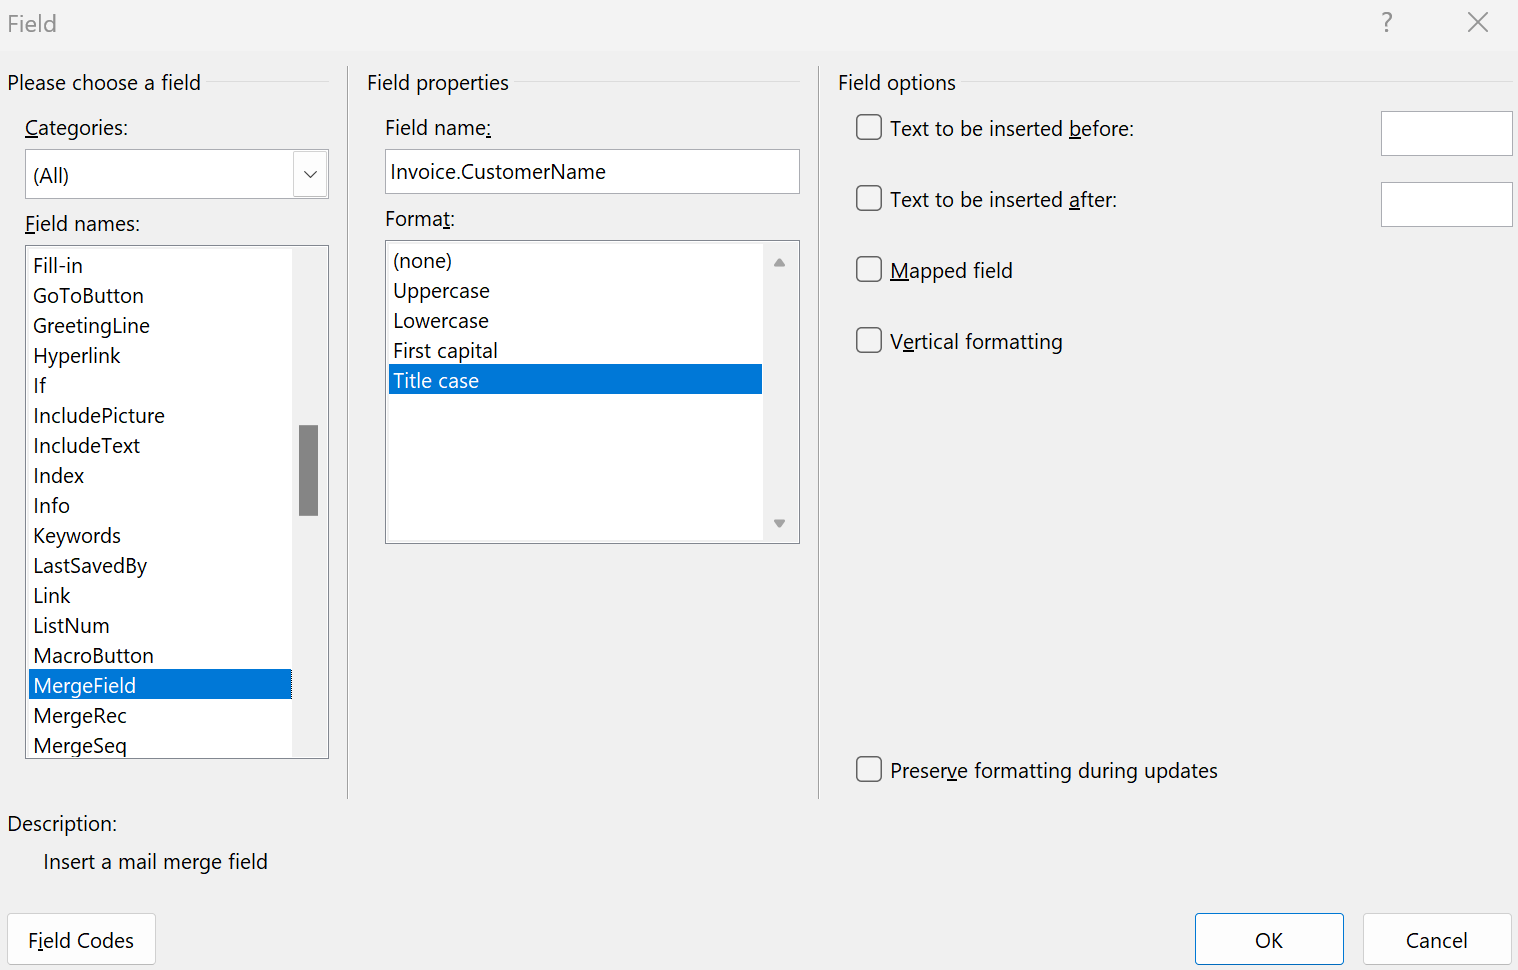
- From the Quick Parts menu, choose "Field" to open the "Field" dialog box.
- In the "Categories" section, select "MergeField".
- In the "Field properties" section, enter the name of the field using the format ModelName.FieldName.
- Adjust any field options as needed, such as formatting or capitalization.
- Click "OK" to insert the field into the document at the cursor position.
- Repeat these steps for any other fields you want to add.
Define ranges for the fields of your data models
To enable DocsNG to recognize the data models you want to incorporate in your document, you need to establish the beginning and ending regions of the data model, which we refer to as ranges.
For instance, in the Invoice example mentioned earlier, the primary data model is Invoice, so the template should begin with the Invoice range. You can do this by adding a field using the format RangeStart:ModelName at the beginning of your template document. Once you've finished adding all the fields, you need to finalize the range using the RangeEnd:ModelName format.
Handeling Multiple Data Models in your tempalates
To ensure that data from related data models is also included in your document according to your intended structure, you can follow a nested field structure in your template as follows:
RangeStart:MainDataModelName
    MainDataModelName.Field1
    MainDataModelName.Field2
        RangeStart:RelatedDataModelName1
            RelatedDataModelName1.Field1
            RelatedDataModelName1.Field2
        RangeEnd:RelatedDataModelName1
        RangeStart:RelatedDataModelName2
            RelatedDataModelName2.Field1
            RelatedDataModelName2.Field2
        RangeEnd:RelatedDataModelName2
    MainDataModelName.Field3
RangeEnd:MainDataModelName
In the above example, first all data of RelatedDataModelName1 will be shown, followed by all data of RelatedDataModelName2, as specified by the nested field structure. It's important to note that if a data model has multi-row data (datasets or arrays), DocsNG supports these structures as well.
Let's check the structure with an example
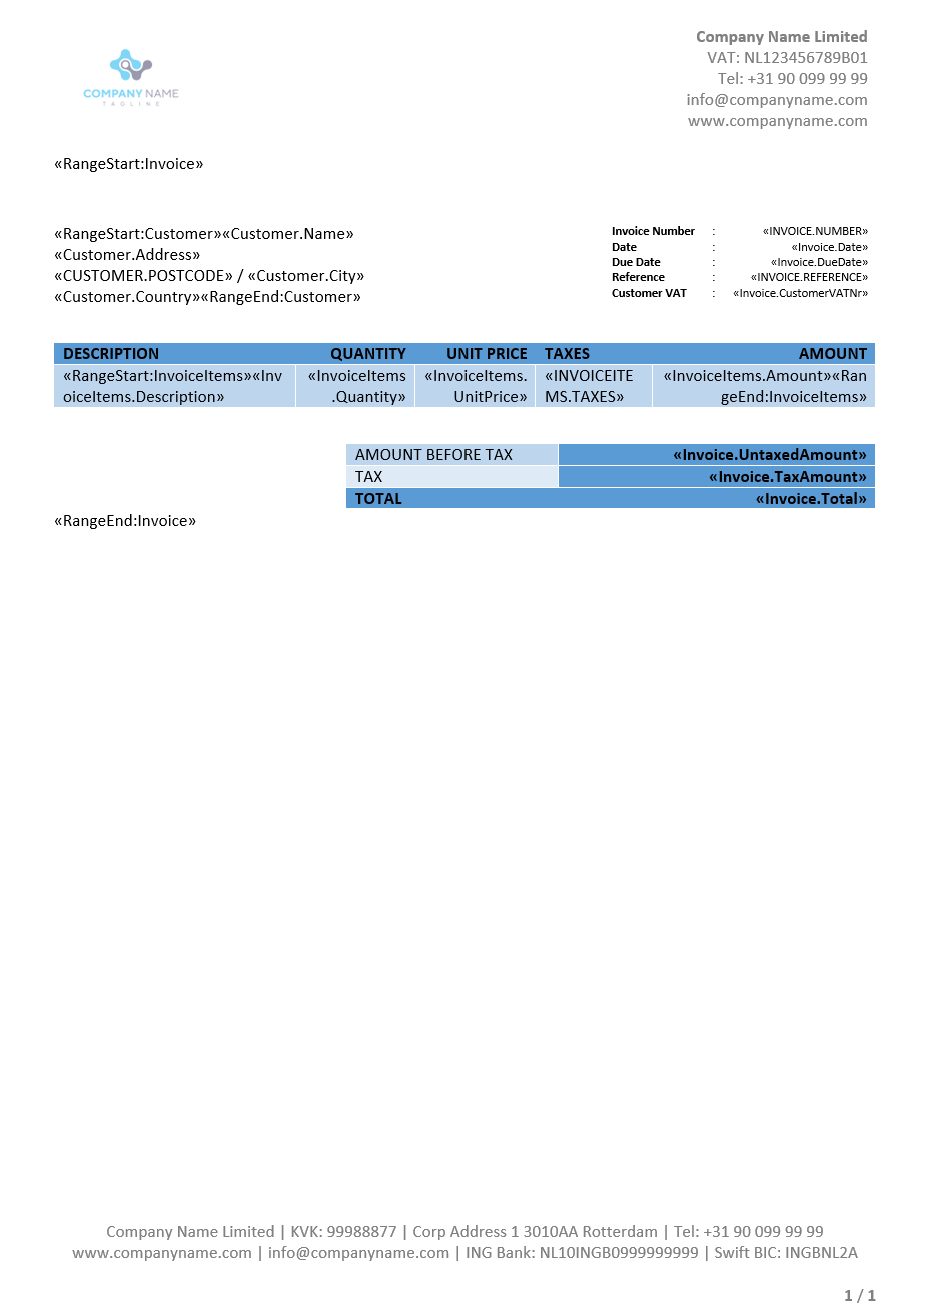
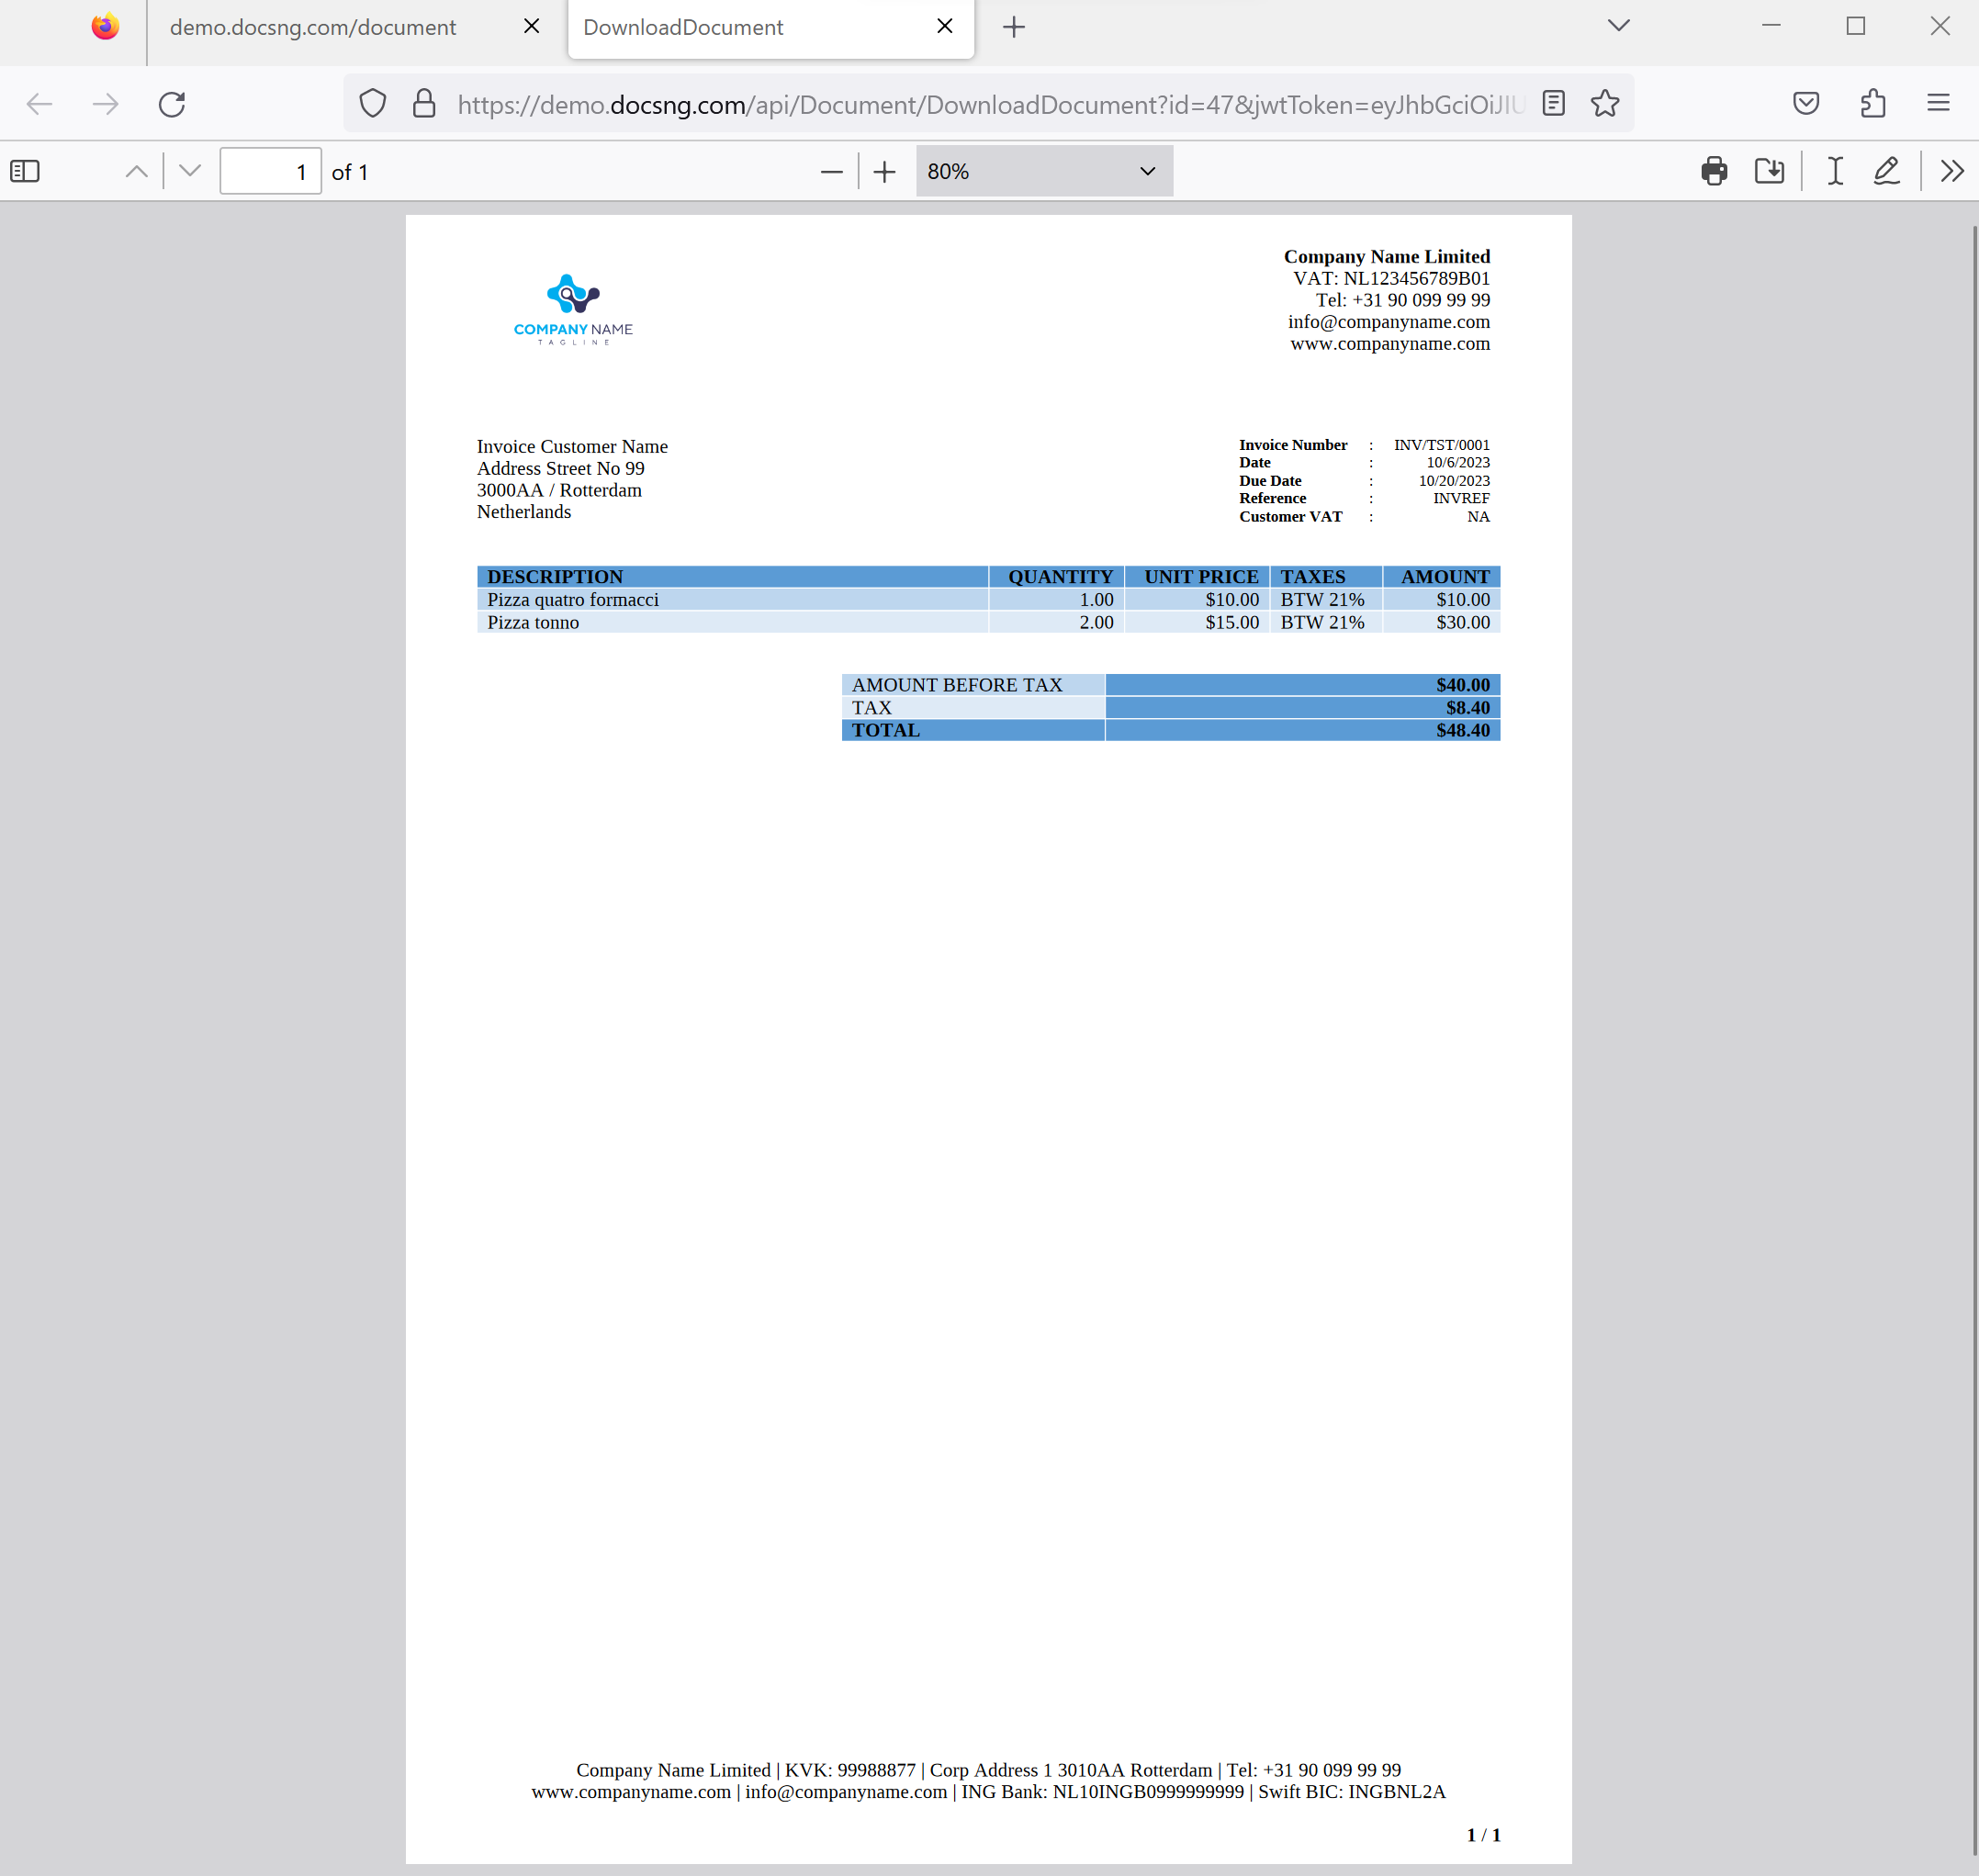
Explanation of randering the output example Invoice template
The rendering process in this example begins at the top of the page. The document contains a table with two cells, one for displaying data from the Customer data model on the left, and the other for listing fields from the Invoice data model on the right. Since the InvoiceItems data model may have multiple data rows, it is placed in a table. The first row of the table serves as the header, while the first cell of the second row starts with the RangeStart.InvoiceItems format and the last cell ends with RangeEnd.InvoiceItems. For each row in the InvoiceItems data model, the output file will contain a corresponding row in the table. Once all data from the InvoiceItems model has been rendered, the template generation process will continue to display data from the Invoice data model.
Randering of InvoiceItems data that wont fit to a single page
If the data of InvoiceItems is too large to fit on a single page, the document will continue rendering with multiple pages. There are several ways to create an appealing template for this scenario.
One way is to ensure that the headers (first row) of the table displaying the InvoiceItems data are shown on all subsequent pages. To achieve this, you can use a feature of MS Word by:
- Setting the table to continue across pages
- Setting the header row to be repeated at the top of each page
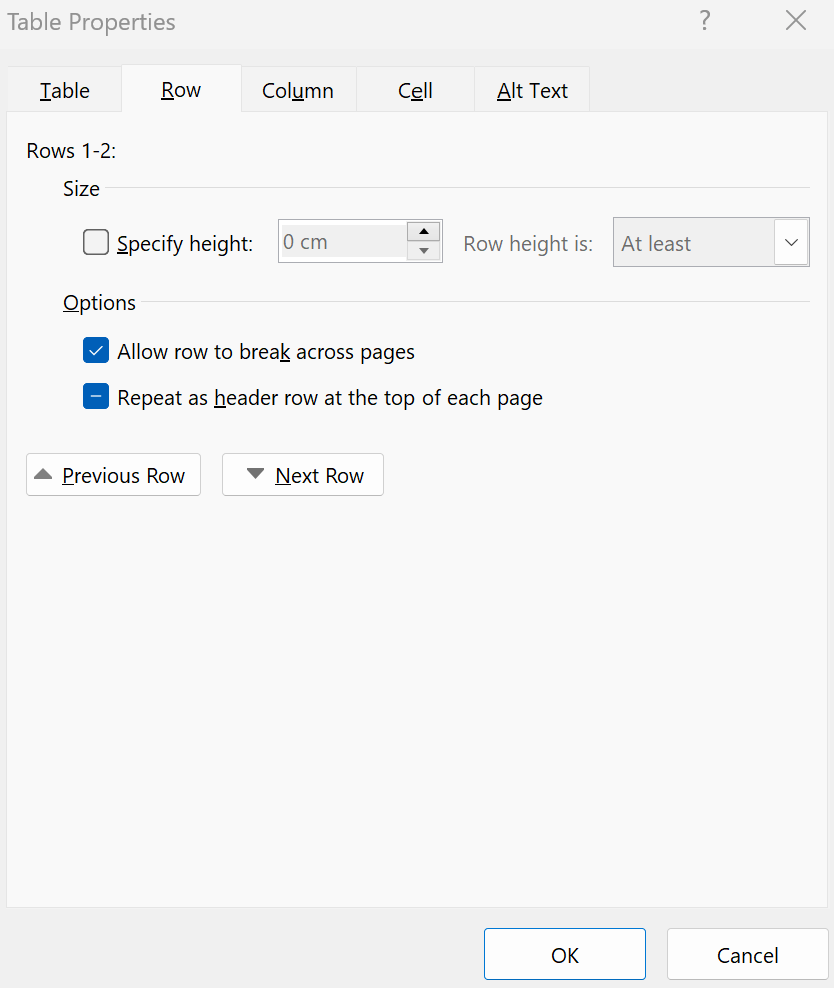
You can adjust these properties in the Table Properties dialog box in MS Word. The following figure shows the properties for the InvoiceItems table.
To display a table in multiple pages with headers on each page, you need to configure some settings in Microsoft Word. Follow the steps below to achieve this:
- Select the table you want to configure.
- Go to the "Table Tools" tab on the ribbon and select the "Layout" tab.
- Click the "Properties" button in the "Table" group.
- In the "Table Properties" dialog box, select the "Row" tab.
- Check the "Repeat as header row at the top of each page" checkbox.
- Select the "Table" tab.
- Check the "Allow row to break across pages" checkbox.
- Click "OK" to close the dialog box.
With these settings, the header row of the table will be repeated on each page where the table continues. This will make the table more readable and help to distinguish between the header and the data rows.
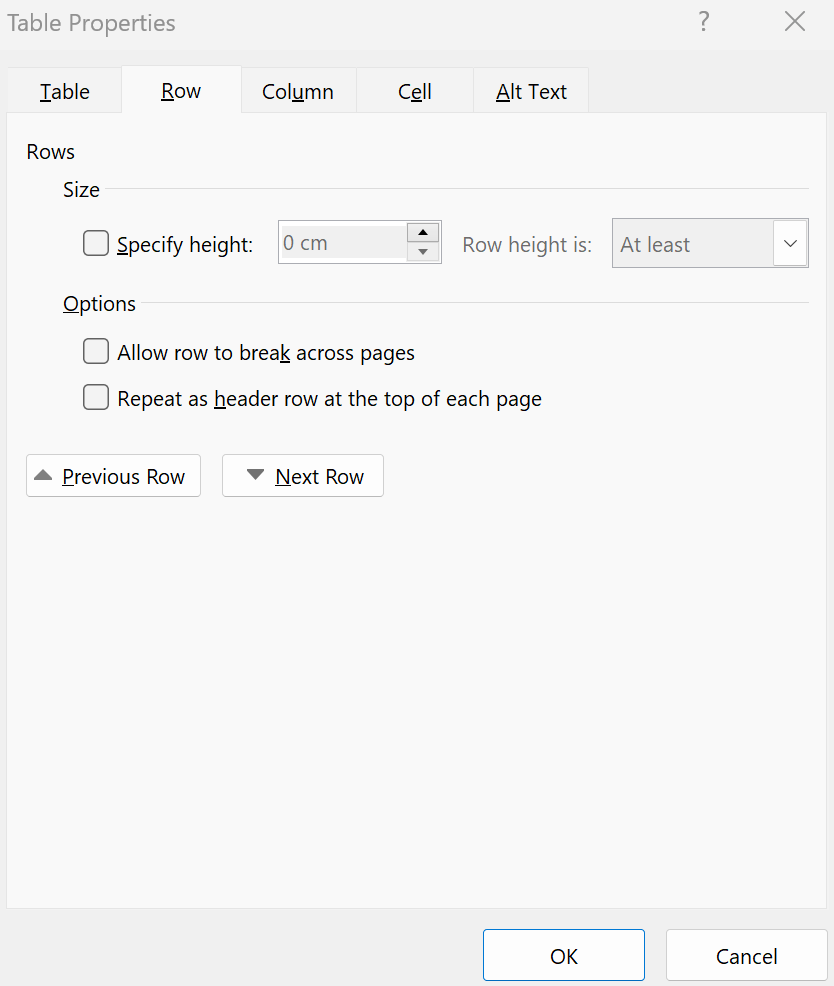
After the rendering of the table showing InvoiceItems is completed and continued to the next page, the rendering of the document output will continue with the remaining items. In our Invoice Example, we have another table that shows the Amount before tax, the tax amount, and the total. If we want the table showing the totals to be displayed in a single page, we need to adjust the settings accordingly.
The following figure shows the properties of the table displaying the totals, where we have set the table to be displayed on a single page, and the data rows not to be broken across pages. This will ensure that the table is displayed in a single page and the data rows continue on the next page.
Multiple documents in a single output file
If you want to render multiple invoices in a single document, you can add a page break just before the RangeEnd.Invoice tag. This will ensure that each invoice starts on a new page, allowing for a clean and organized presentation of the invoices in the document.
Example Word Documents
The example templates used in the above example can be downloaded using the following links.
Download the MS Word Template for a Single Invoice
Download the MS Word Template for Multiple Invoices to be Rendered in a Single Document
Localisation
At DocsNG, we understand the importance of accurate and localized information in your documents. That's why our template engine offers full support for localization across all required fields, including numbers, currencies, date and time.
Each template in DocsNG has its own default localization setting, which determines the language and formatting for date, time, number, and currency fields when the document output is rendered. Additionally, users can override the default setting during document output generation to cater to individual localization needs. This feature ensures that the generated documents accurately reflect the formatting and language preferences of the intended audience, regardless of their location in the world.
For example, if you're creating an invoice for a client in France, you can use DocsNG to automatically format the date and currency according to French conventions. Similarly, if you're creating a report for a team in Japan, you can use DocsNG to display time in the 24-hour format preferred in that country.
With DocsNG, you can rest assured that your documents will accurately reflect the formatting and language preferences of your intended audience.
Advanced localisation settings using MS Word's Formatting capabilities
MS Word formatting capabilities can be used for advanced localization settings (if you would like to differentiate from the default localization settings) when formatting data in a document. Here are the steps to apply custom formatting to a date or text field:
- Select the mail merge field, for example, Invoice.Date.
- Press [Alt] + F9 or right-click on the field and select Toggle Field Code to reveal the field coding, which should look something like { MERGEFIELD Invoice.Date }.
- Edit the field by inserting a switch code at the end of the field to apply the desired format. For instance, to change the text to uppercase, the field can be edited as { MERGEFIELD Invoice.Date @ dd/MM/yyyy } (see other examples of text and date formatting below).
- Press [Alt] + F9 again.
- Position the cursor anywhere in this field and press the [F9] function key to update it. Alternatively, right-click on the field and select Update Field.
For this example, the output date format for Invoice.Date field will be shown dd/MM/yyyy regardless of localisation setting of the template.
Formatting options for Mail Merge Fields in MS Word
To customize the formatting of a mail merge field, you can use field codes and switch codes in MS Word. Below are some examples of the expected results and field codes for various formatting options:
| Expected Result | Field Code | Desired Result | Displayed Result |
|---|---|---|---|
| UPPERCASE | {MERGEFIELD Name *Upper } | Capitalizes all letters | DOCSNG IS AMAZING! |
| lowercase | {MERGEFIELD Name *Lower} | Transforms all letters to lowercase | docsng is amazing! |
| Title Case | {MERGEFIELD Name *Caps} | Capitalizes the first letter of each word | Docsng Is Amazing! |
| Sentence case | {MERGEFIELD Name *FirstCap} | Capitalizes only the first letter of the first word | Docsng is amazing |
Options for Date Formatting Switches
To customize the formatting of a date mail merge field, you can use the date-time format switch \@ and add the desired expressions for the day, month, and year in double quotes. Here are some examples:
| Switch | Description |
|---|---|
| yyyy | Year. Use yy to display the last two digits of any year. Use yyyy to display all four digits of any year. |
| M | Month. Use MMMM to spell out the month (such as September or October), MMM to display the three-letter abbreviation for the month (such as Sep or Oct), MM to display the month in two digits with a leading zero for single-digit months (such as 09, 10), or M to display the month in digits (such as 9, 10). |
| d | Day. Use dddd to spell out the day of the week (such as Sunday or Monday), ddd to display the three-letter abbreviation of the day (such as Sun or Mon), dd to display the day in two digits with a leading zero for single-digit days (such as 09, 10), or d to display the day in digits (such as 9, 10). |
Note that the d, M, y expressions can be arranged in different orders, but the usage of the uppercase “M” for months is important as the lowercase “m” is used for minutes. It is also possible to add text (such as /, -, ...) and spaces; just make sure the added text remains within the double quotes.
Some Date Examples
| Field Code | Displayed Results |
|---|---|
| { MERGEFIELD Date \@ "dddd, MMMM d, yyyy" } | Saturday, July 9, 2022 |
| { MERGEFIELD Date \@ "MM/dd/yyyy" } | 07/09/2022 |
| { MERGEFIELD Date \@ "M-d-yy" } | 7-9-22 |
| { MERGEFIELD Date \@ "MMMM d, yyyy" } | July 9, 2022 |
Some number and currency examples
| Data | Field Code | Word Result Displayed | Result |
|---|---|---|---|
| 1000 | { MERGEFIELD Amount # ,0 } | Rounded whole numbers, thousands separator | 1,000 |
| 1000.25 | { MERGEFIELD Amount # $,0 } | Rounded whole numbers, currency, thousands separator | $1,000 |
| 1234.5 | { MERGEFIELD Amount # ,0.00 } | 2 decimal places, thousands separator | 1,234.50 |
| 1234.5 | { MERGEFIELD Amount # $,0.00 } | 2 decimal places, currency, thousands separator | $1,234.50 |
| 1234.5 | { MERGEFIELD Amount # $#,##0.00 } | Same as above | $1,234.50 |
| -1234.5 | { MERGEFIELD Amount # "$,0.00;($,0.00);'-'" } | Currency, with brackets around negative numbers and a hyphen for 0 values | ($1,234.50) |
| 5 | { MERGEFIELD Amount # 0.00 } | 2 decimal places | 5.00 |
| 0.45 | { MERGEFIELD Amount # 0.## } | 2 decimal places, leading zero | 0.45 |
| 0.4 | { MERGEFIELD Amount # #.## } | 2 decimal places only if values | .4 |
| 1234 | { MERGEFIELD ZipCode # 00000 } | 5 numeric positions, zip code or another number | 01234 |
The # $,0.00 is a numeric switch code that DocsNG uses for formatting data generated in documents. It allows for precision control of the displayed value in a field, where 0.00 can be adjusted to anything from 0 to 0.000000000000000. A numeric switch code including 0 creates a fixed position, while # sets a pattern without a required 0 or placeholder.
Step 3: Generate documents from GUI or through Restful API
Generating documents with DocsNG is effortless - simply click a button and let our software do the work for you! Whether you need to generate individual documents or large volumes of them, DocsNG offers two easy-to-use options:
- our intuitive GUI (Graphical User Interface), or
- our flexible Restful API.
With DocsNG, you can generate output files in PDF or DOCX ensuring compatibility with a wide range of systems and applications. No matter your needs, DocsNG simplifies the document generation process so you can focus on what matters most.
Generate documents from DocsNG GUI
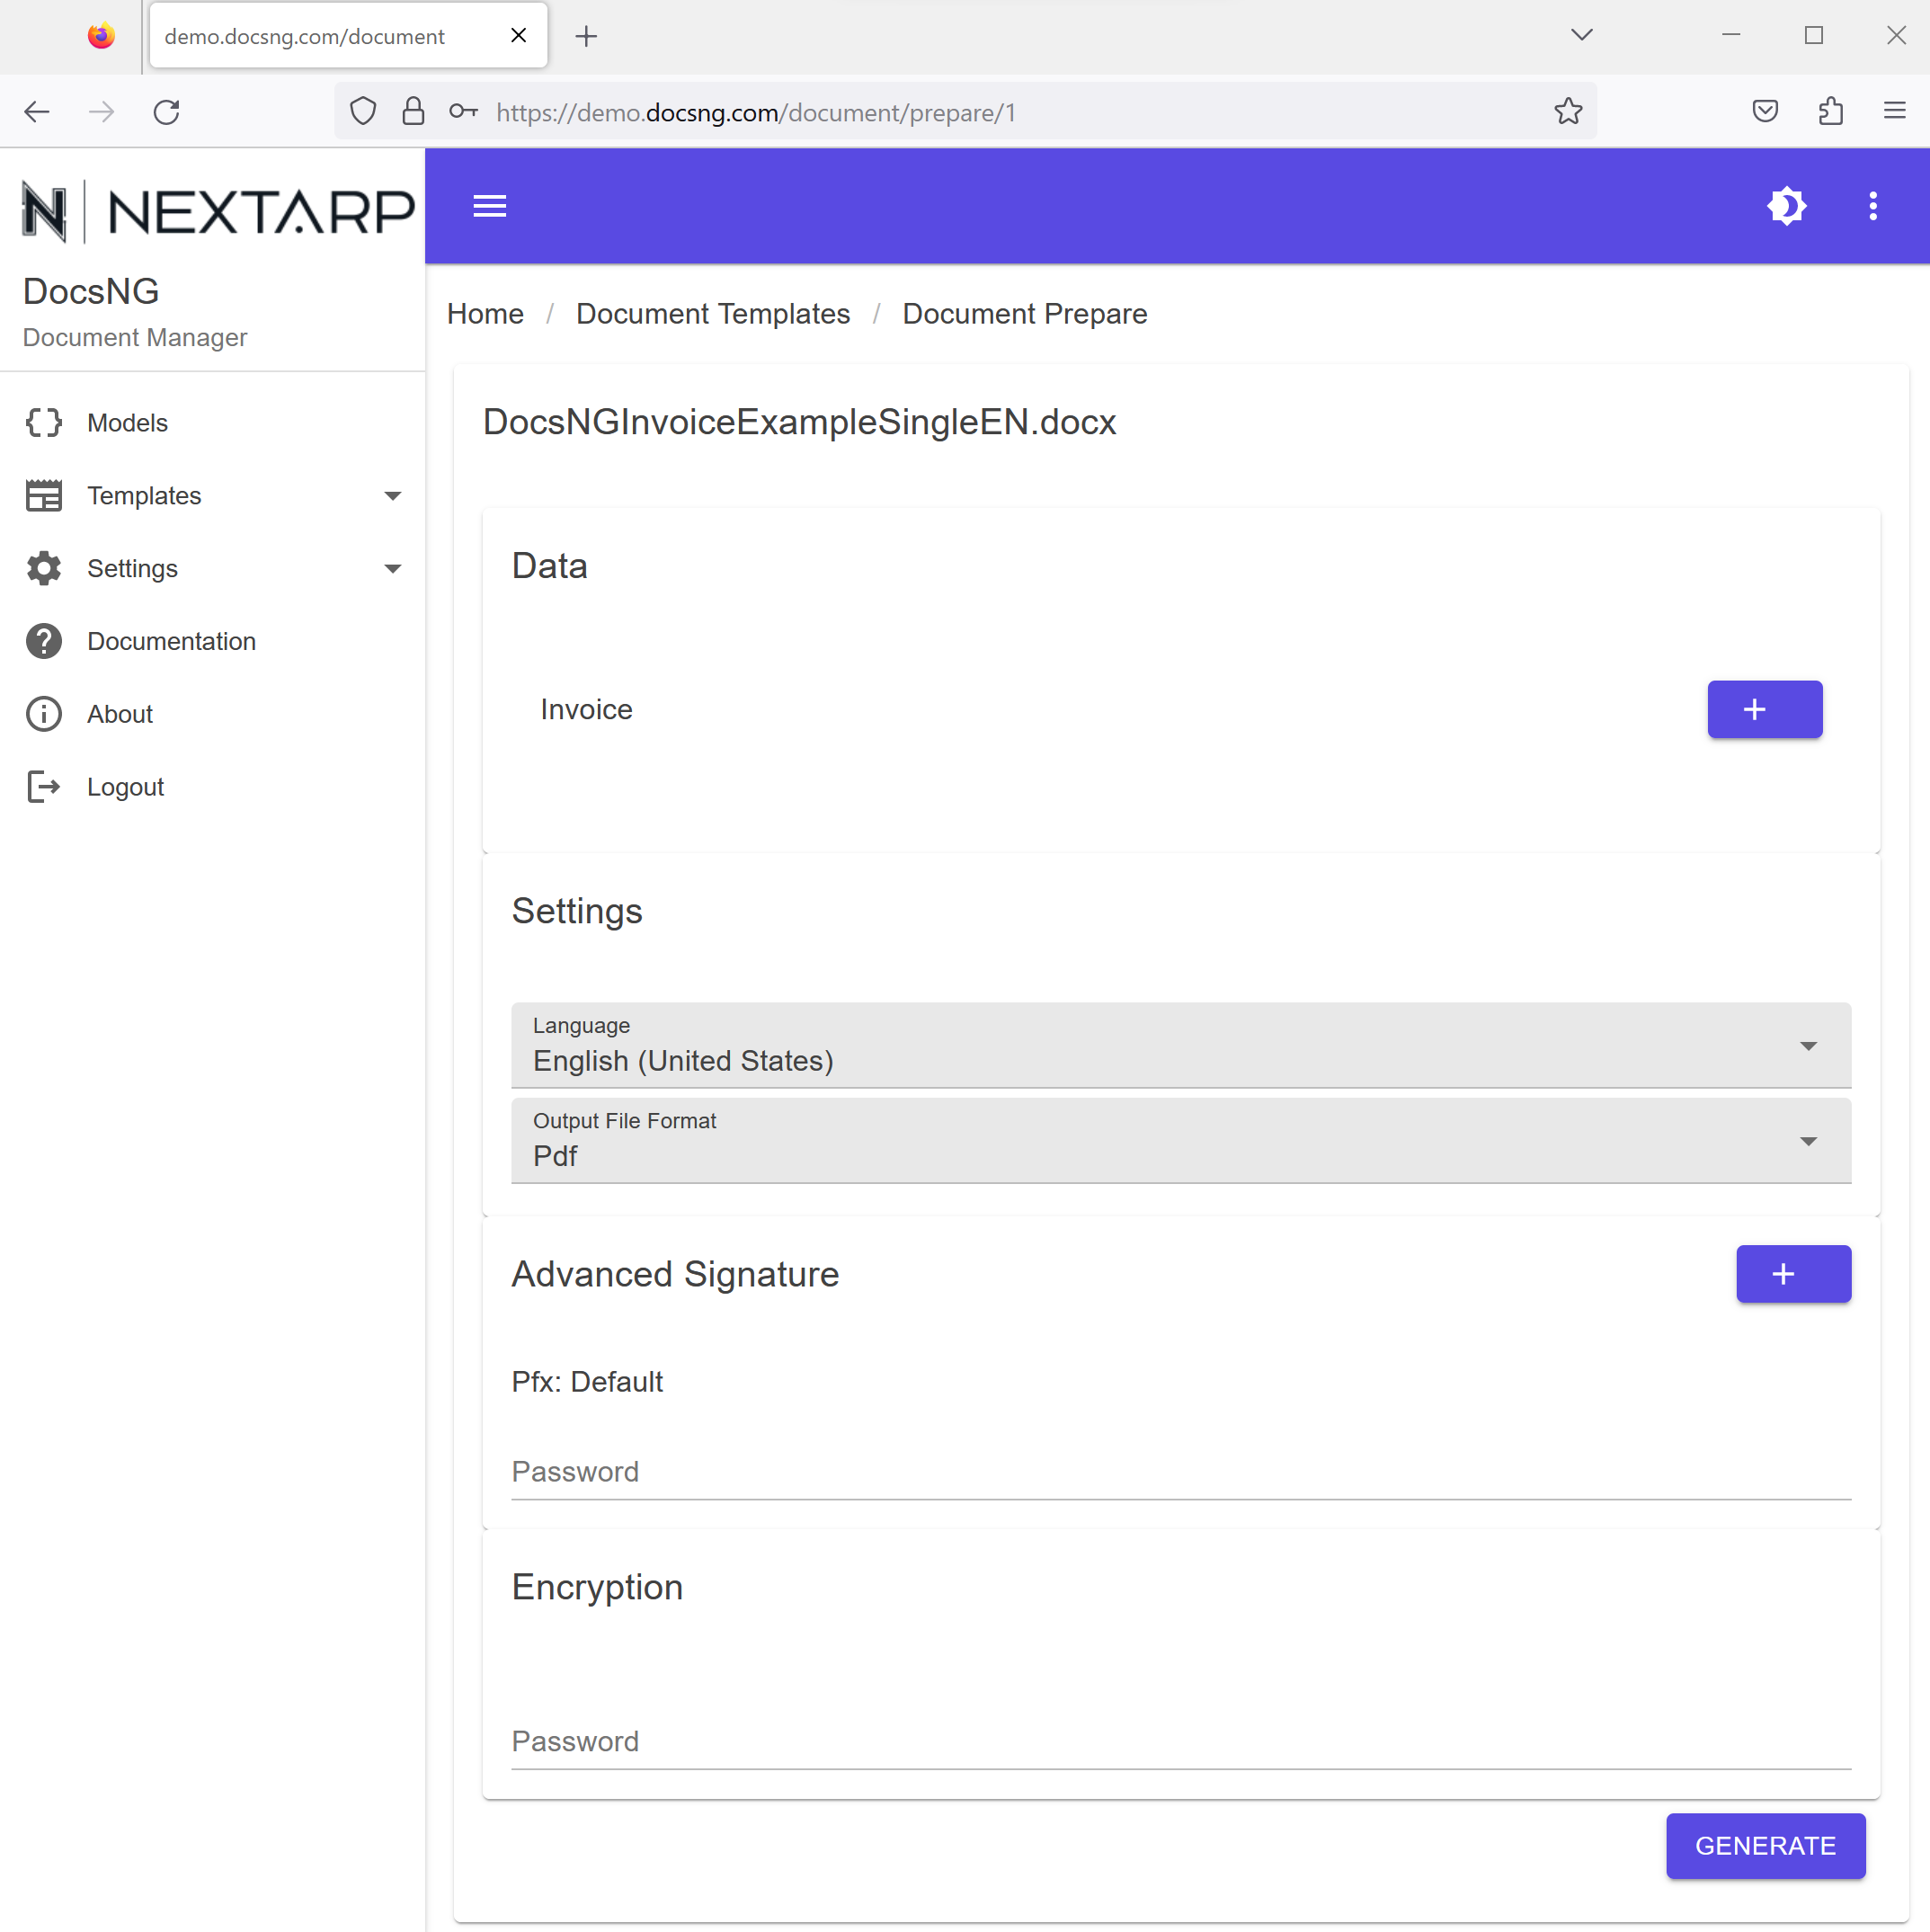
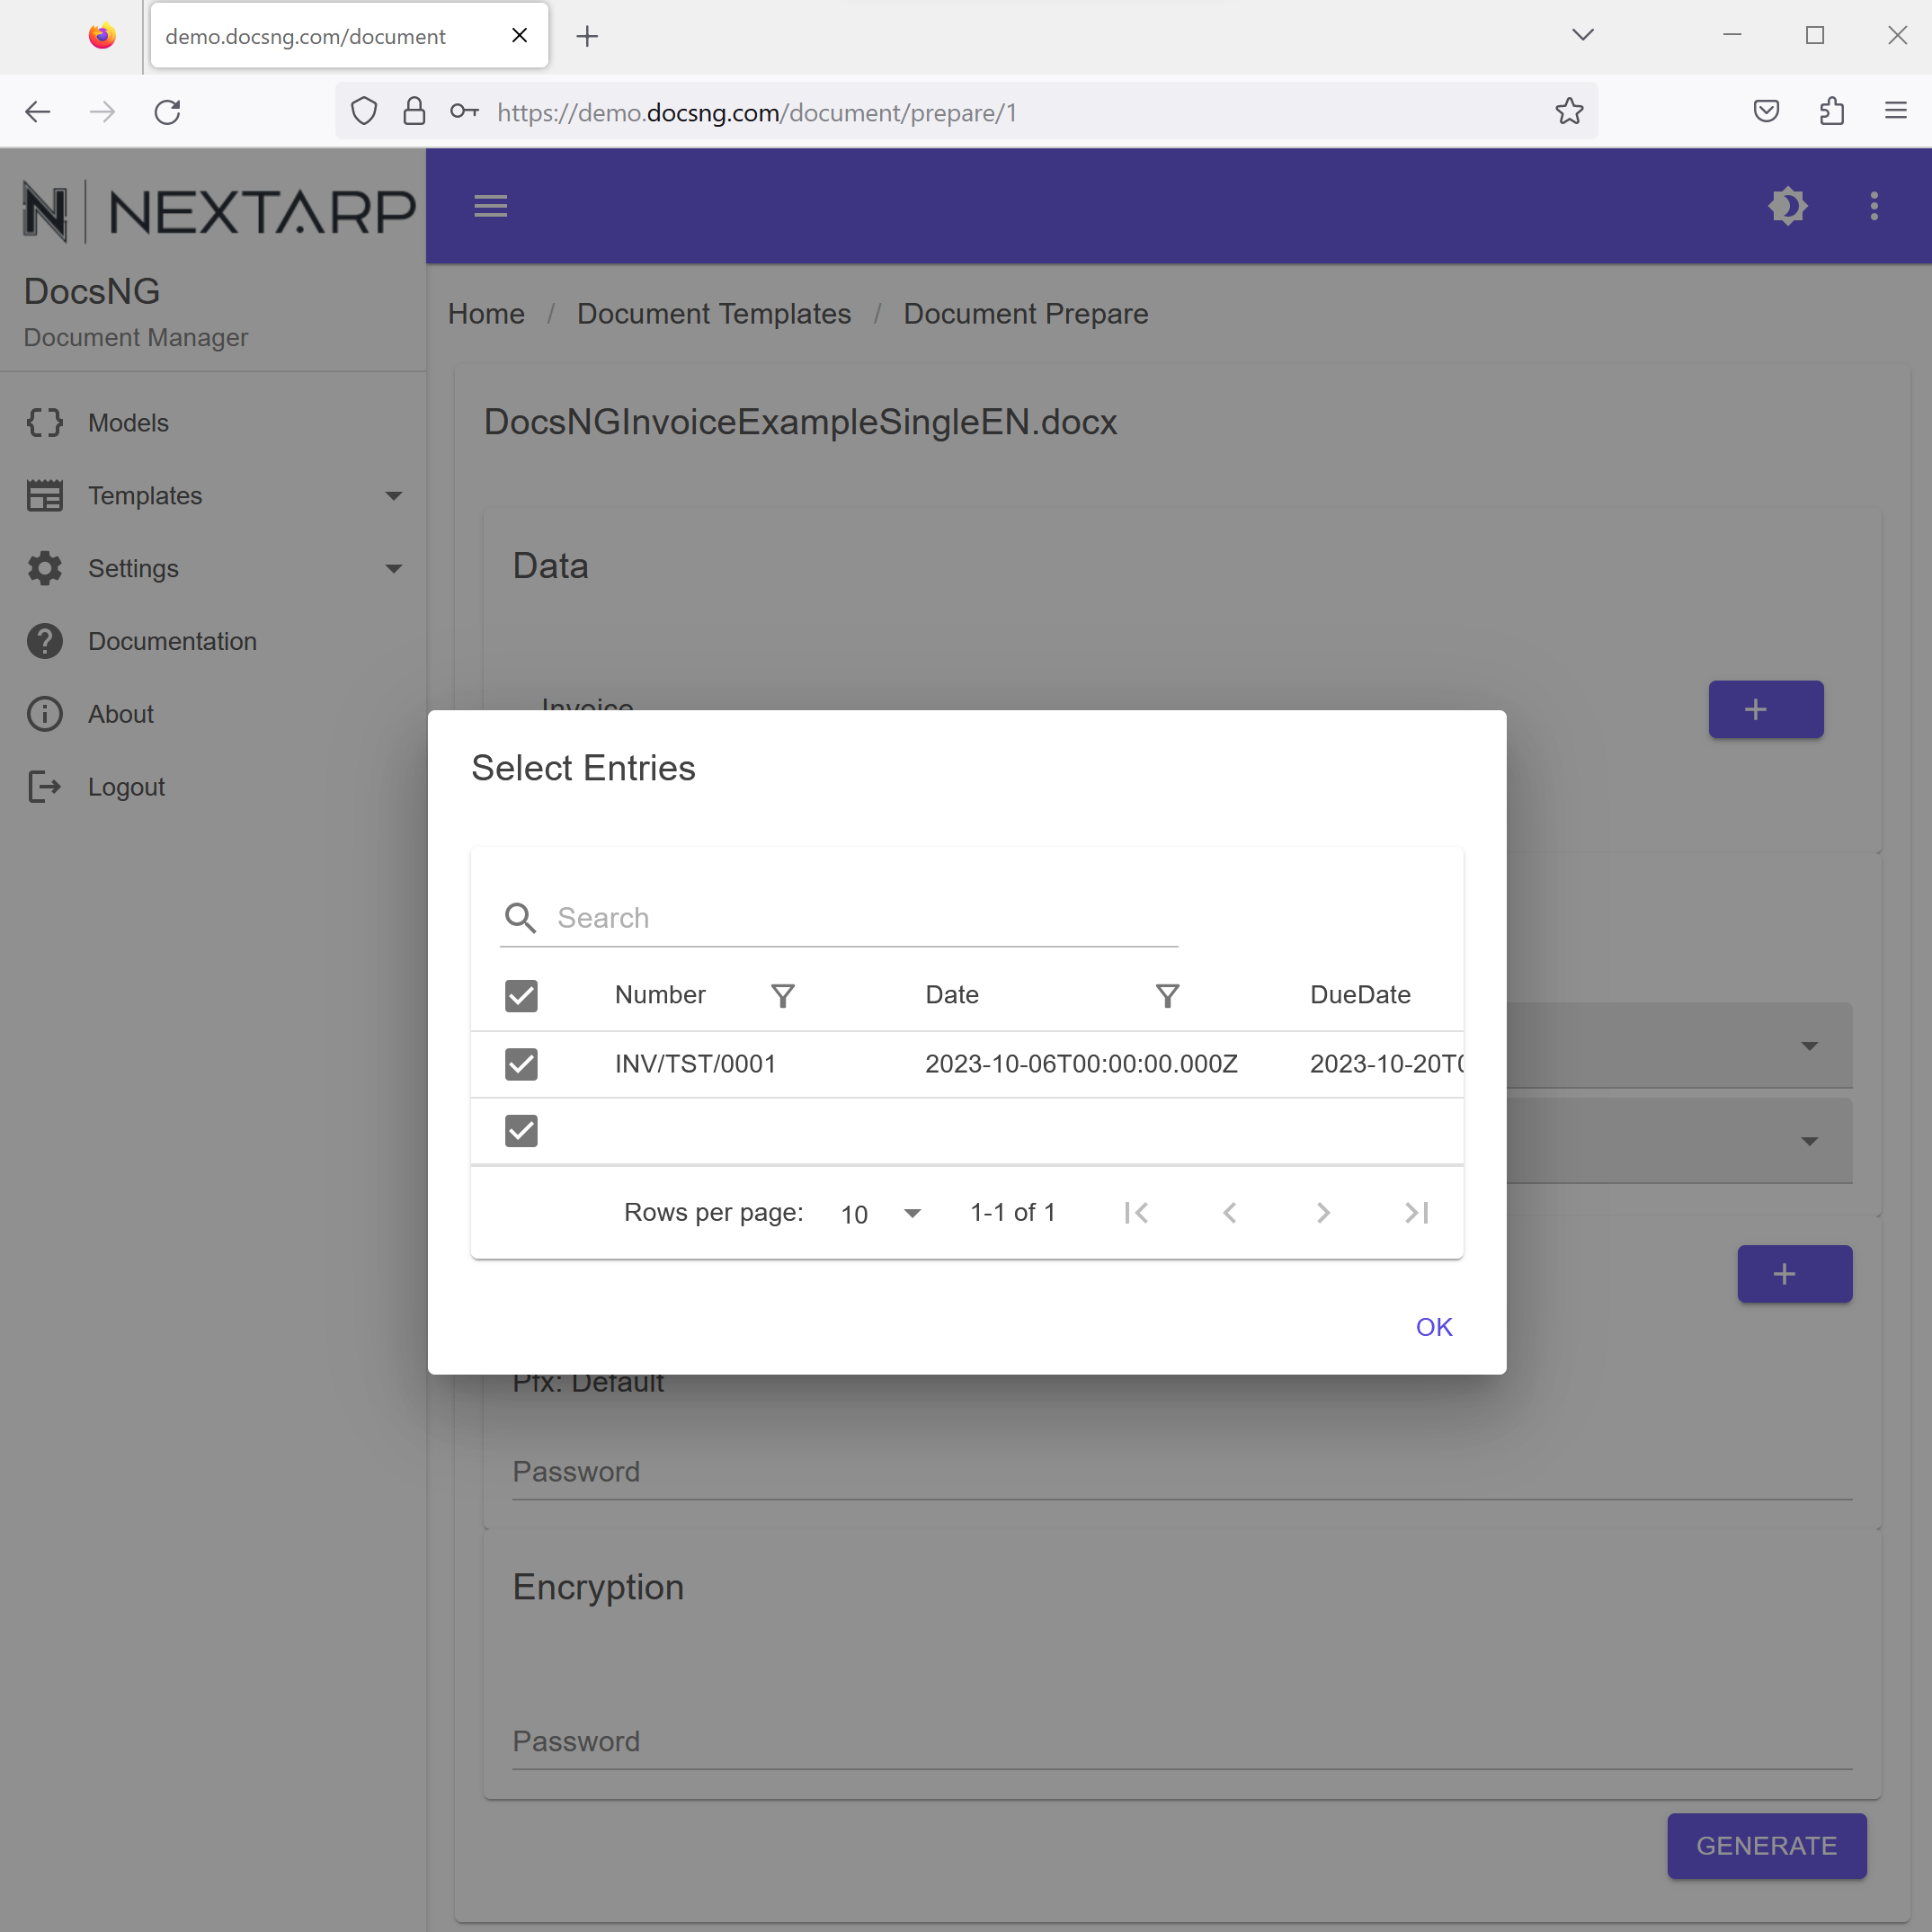
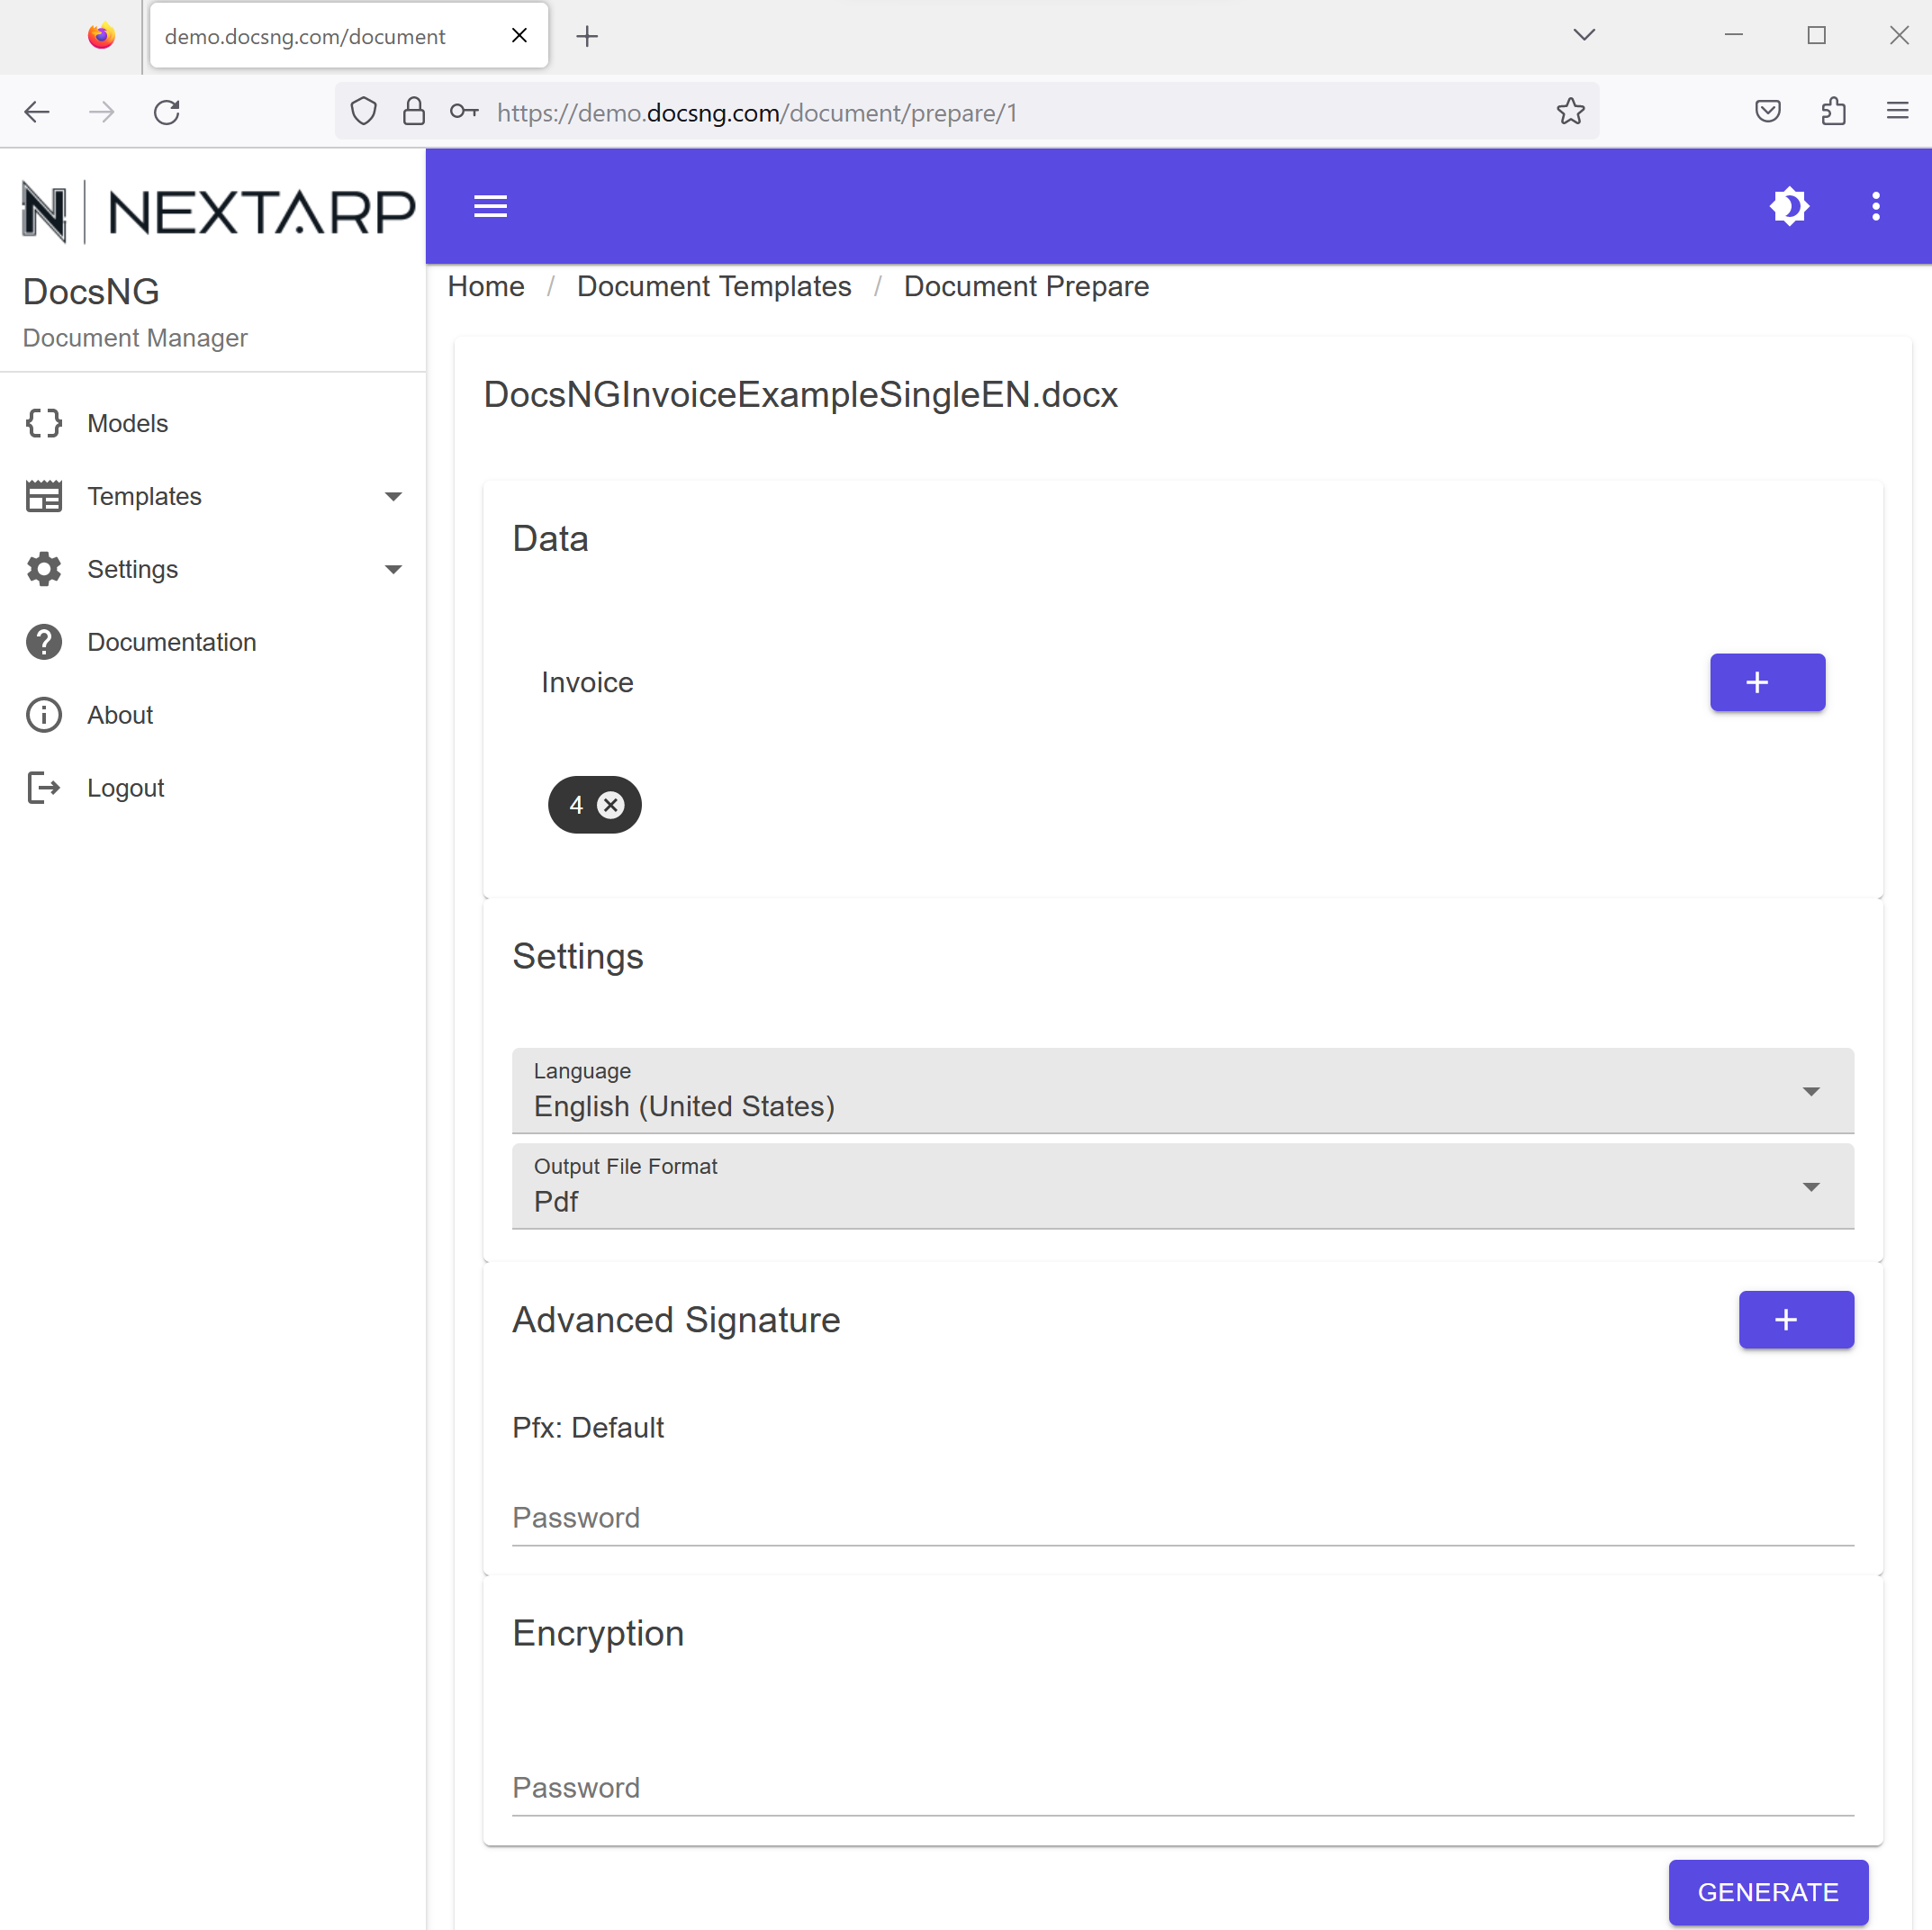
Generating documents through the DocsNG GUI is a straightforward process. For GUI document generation, as a prerequisite, you need to input your data using the automatically generated data entry and manipulation screens for your data models. Then, on the templates screen, select the data you wish to include in your document and simply click the "Generate" button. The following steps illustrates the required steps:
- Step 1: Go to templates screen
- Step 2: Choose the template you would like to generate your document from
- Step 3: Search and find data you would like use to generate your document from
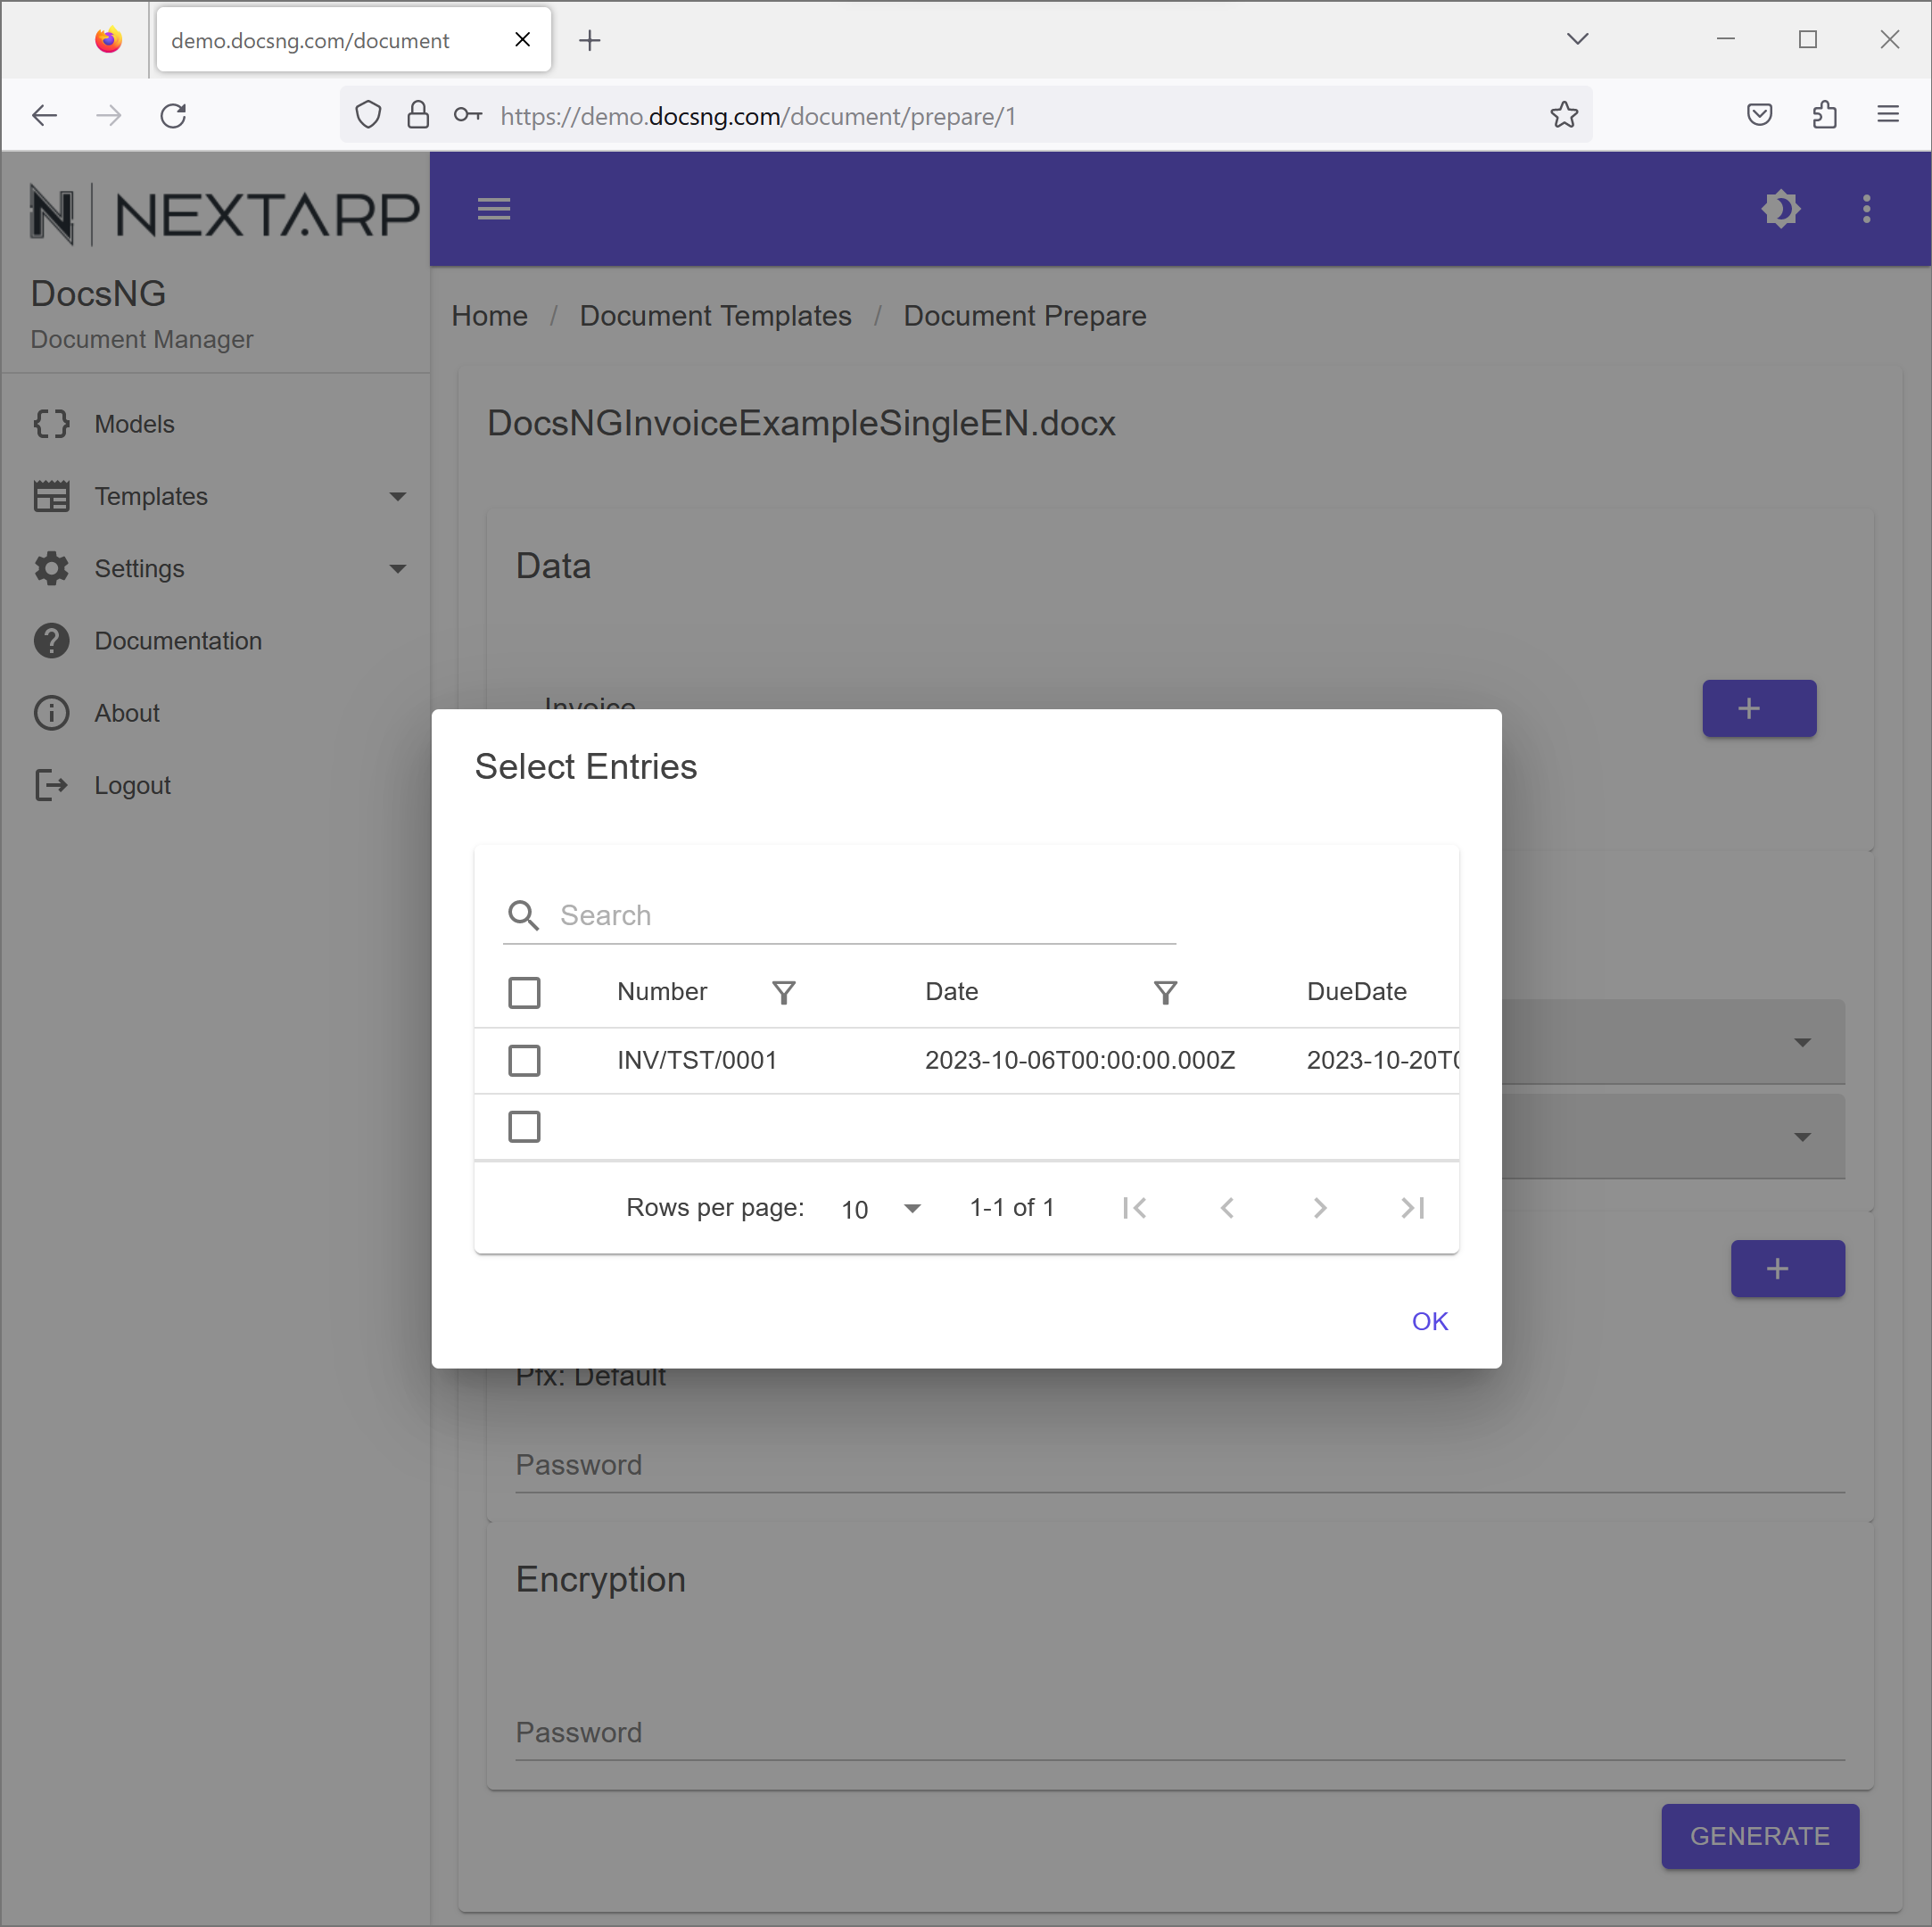
- Step 4: Choose data you would like use to generate your document from
- Step 5: If needed change the regional settings using Language selection field or change the Output File Format as you need, then press "Generate" button.
- Step 6: The generated document will be openned in a new tab in your browser
Additional settings during document generation
There are several additional settings you can define or override during document generation.
- Language: Localization settings determine the data format for DateTime, Number, and Currency fields. In some cases, a specific document may require different localization settings than those defined in the template's default. DocsNG allows you to override the default settings for a single document generation if needed.
- Output File Format: The document generation screen produces PDF files by default, but you can modify the output format by selecting this field to generate MS Docx files. It's important to note that encryption and signature settings do not apply to Docx output, and they will not impact the resulting document.
- Advanced Signature: When generating a PDF document, you have the option to apply a cryptographic signature to the output file using a certificate stored in a pfx file. There are two ways to achieve this:
- Users can upload their certificate within a password-protected pfx file to their profile through the Settings/Account screen in the Advanced Signature Section. During document generation, they can then simply provide the password for the pfx file to sign the output document.
- Alternatively, users can directly upload the pfx file during the document generation process and enter the pfx file's password to apply the digital signature to the output document.
- Encryption: When creating a PDF document, you have the option to secure the output file using AES encryption and a designated password. While opening the resulting PDF document, users will need to enter the encryption password that was specified during the document generation process.
Please consult the Installation & Administration Guide for configuring the following application-wide settings:
- Advanced PDF permissions such as print, copy content, fill form etc.
- Visibility of digital signatures on the output PDF files
- The URL of the timestamp server to be used in conjunction with digital signatures
Generate documents from Restful API
The document generation process in DocsNG using the Restful API closely resembles document generation through the GUI. The key differences are:
- When using the Restful API, there's no requirement to have pre-entered data in the DocsNG database.
- It is not possible to send pfx file for advanced signing process. For advanced signing password protected pfx file must be already stored in the profile of the user.
Check out our public Postman collection, which is available for running against our demo environment
The postman collection contains a set of predefined API requests and associated tests that can be executed using Postman. It allows you to interact with our demo environment's RESTful API and observe how the API functions. This can be useful for testing, learning, or understanding the capabilities of DocsNG.
Here's a concise overview of the Restful API for document generation process:
-
Step 1: Sign in to your DocsNG account through the API using the following endpoint: [HTTP Post] [URL of DocsNG]/api/Account/Login
- Parameters:
- Username: Your DocsNG account username
- Password: Your DocsNG account password
- Upon successful authentication, the API will provide a Bearer Token.
- Parameters:
-
Step 2: Send your data [HTTP Post] [URL of DocsNG]/api/Document/GenerateDocumentFromJson endpoint to generate a document
- Parameters (querystring):
- culture (string): Localisation override for the output document. Examples: en-US, nl-NL, de-DE
- templateId (integer): the Id of the template from DocsNG. Examples: 1,2,3,4, etc.
- outputType (integer): 1 for docx output, 2 for PDF output
- encryptPwd (string): password for the PDF encryption
- pfxPwd (string): password of the certificate in pfx file format stored in the profile of the user to be used for advanced signing
- Parameters (header)
- Accept-Language (string): Language choice (default en) for API resonse messages. Possible values are: en, en, es, de, nl, tr, fr, it, pt
-
Request body
-
JSON array: In the RESTful API of DocsNG, the data to be used for document generation needs to be sent in the request body in the form of a JSON array. This JSON array should contain all the necessary information for generating documents, including data structure and relationships.
Here's a breakdown of how this works:
- JSON Array: The main array is used to organize the data for generating multiple documents. Each element in this array represents one document to be generated.
- JSON Object for Each Document: Within the main JSON array, each element is a JSON object that encapsulates all the data required for a specific document. This JSON object should include not only the document's content but also its data structure and data and structure of other models that the model has relationship to.
- Data Structure: The JSON object for each document must define its data structure, which includes specifying the type and format of data fields. This ensures that the document generation process understands how to interpret and display the data correctly.
- Relationships: If the document relies on data from other entities, these relationships should also be included in the JSON object. This helps the document generation process access and incorporate related data when creating the document.
By providing all the necessary data, including data structure and relationships, in the JSON objects within the JSON array, the RESTful API can effectively generate documents with the desired content and connections to related data entities. This approach ensures that the documents accurately reflect the data's structure and dependencies, making it a powerful feature for creating complex and interconnected documents through the API.
-
-
Response body is the id of the generated document
Blow is the explanation of the structure
Blow is an example JSON array for invoice generation that we used in the examples of the DocsNG[ //Main JSON Array: Each individual JSON object within the array corresponds to a distinct document generation task. { "Id": 201, // Custom User-Defined Identifier for Document Generation Process "ModelId": 3, // Data Model ID in DocsNG "Name": "Invoice", // Data Model Name in DocsNG "Fields": [ //Array of model fields and their corresponding data. { "Name": "Number", // Name of the field in the data model "Value": "INVFromAPI1", // Value of the field "Type": "String", // Data type of the field. Possible values String, DateTime, Currency, Double, Boolean "IsRequired": "Y" // choice if the field is mendatory. Possible values: Y = Yes, N = No } ], "Relations": [ //Array of data of data models that main model has relation to, in nested structure { "Id": 1, "ModelId": 1, "Name": "Customer", "Fields": [ { "Name": "Name", "Value": "Customer From API", "Type": "String", "IsRequired": "Y" } ], "Relations": [] } ] } ][ { "Id": 201, "ModelId": 3, "Name": "Invoice", "Fields": [ { "Name": "Number", "Value": "INVFromAPI1", "Type": "String", "IsRequired": "Y" }, { "Name": "Date", "Value": "2023-10-06T09:00:00.594Z", "Type": "DateTime", "IsRequired": "Y" }, { "Name": "DueDate", "Value": "2023-10-31T09:00:00.594Z", "Type": "DateTime", "IsRequired": "Y" }, { "Name": "Reference", "Value": "Test", "Type": "String", "IsRequired": "Y" }, { "Name": "CustomerVATNr", "Value": "TestVat", "Type": "String", "IsRequired": "Y" }, { "Name": "UntaxedAmount", "Value": "100", "Type": "Currency", "IsRequired": "Y" }, { "Name": "TaxAmount", "Value": "21", "Type": "Currency", "IsRequired": "Y" }, { "Name": "Total", "Value": "121", "Type": "Currency", "IsRequired": "Y" } ], "Relations": [ { "Id": 1, "ModelId": 1, "Name": "Customer", "Fields": [ { "Name": "Name", "Value": "Customer From API", "Type": "String", "IsRequired": "Y" }, { "Name": "Address", "Value": "Test Street 33", "Type": "String", "IsRequired": "Y" }, { "Name": "Postcode", "Value": "2023AA", "Type": "String", "IsRequired": "Y" }, { "Name": "City", "Value": "Rotterdam", "Type": "String", "IsRequired": "Y" }, { "Name": "Country", "Value": "Netherlands", "Type": "String", "IsRequired": "Y" } ], "Relations": [] }, { "Id": 100, "ModelId": 2, "Name": "InvoiceItems", "Fields": [ { "Name": "Description", "Value": "Pizza 1 From API", "Type": "String", "IsRequired": "Y" }, { "Name": "Quantity", "Value": "2", "Type": "Double", "IsRequired": "Y" }, { "Name": "UnitPrice", "Value": "20", "Type": "Currency", "IsRequired": "Y" }, { "Name": "Taxes", "Value": "BTW 21%", "Type": "String", "IsRequired": "Y" }, { "Name": "Amount", "Value": "40", "Type": "Currency", "IsRequired": "Y" } ], "Relations": [] }, { "Id": 101, "ModelId": 2, "Name": "InvoiceItems", "Fields": [ { "Name": "Description", "Value": "Pizza 2 From API", "Type": "String", "IsRequired": "Y" }, { "Name": "Quantity", "Value": "1", "Type": "Double", "IsRequired": "Y" }, { "Name": "UnitPrice", "Value": "10", "Type": "Currency", "IsRequired": "Y" }, { "Name": "Taxes", "Value": "BTW 21%", "Type": "String", "IsRequired": "Y" }, { "Name": "Amount", "Value": "10", "Type": "Currency", "IsRequired": "Y" } ], "Relations": [] }, { "Id": 102, "ModelId": 2, "Name": "InvoiceItems", "Fields": [ { "Name": "Description", "Value": "Pizza 3 From API", "Type": "String", "IsRequired": "Y" }, { "Name": "Quantity", "Value": "5", "Type": "Double", "IsRequired": "Y" }, { "Name": "UnitPrice", "Value": "10", "Type": "Currency", "IsRequired": "Y" }, { "Name": "Taxes", "Value": "BTW 21%", "Type": "String", "IsRequired": "Y" }, { "Name": "Amount", "Value": "50", "Type": "Currency", "IsRequired": "Y" } ], "Relations": [] }, { "Id": 103, "ModelId": 2, "Name": "InvoiceItems", "Fields": [ { "Name": "Description", "Value": "Free Pizza 4 From API", "Type": "String", "IsRequired": "Y" }, { "Name": "Quantity", "Value": "1", "Type": "Double", "IsRequired": "Y" }, { "Name": "UnitPrice", "Value": "0", "Type": "Currency", "IsRequired": "Y" }, { "Name": "Taxes", "Value": "BTW 21%", "Type": "String", "IsRequired": "Y" }, { "Name": "Amount", "Value": "0", "Type": "Currency", "IsRequired": "Y" } ], "Relations": [] }, { "Id": 104, "ModelId": 2, "Name": "InvoiceItems", "Fields": [ { "Name": "Description", "Value": "Free Pizza 5 From API", "Type": "String", "IsRequired": "Y" }, { "Name": "Quantity", "Value": "1", "Type": "Double", "IsRequired": "Y" }, { "Name": "UnitPrice", "Value": "0", "Type": "Currency", "IsRequired": "Y" }, { "Name": "Taxes", "Value": "BTW 21%", "Type": "String", "IsRequired": "Y" }, { "Name": "Amount", "Value": "0", "Type": "Currency", "IsRequired": "Y" } ], "Relations": [] } ] } ] - Parameters (querystring):
-
Step 3: Download the generated document [HTTP Get] [URL of DocsNG]/api/Document/DownloadDocument
- Parameters:
- id (integer): The unique identifier of the generated document, which is returned as a response from the Generate API call.
- jwtToken (string): jwtToken of the user
- response: the binay of the generated document will be returned as response to the request
- Parameters:
Please refer to developer guide for full documentation to use DocsNG Restful APIs.
Bulk Data Upload Using DocsNG GUI with CSV Files
The DocsNG platform provides a convenient way to upload data in bulk using Comma-Separated Values (CSV) files. This feature is particularly useful when you have a substantial amount of data to import into DocsNG. Below is a step-by-step guide on how to use the GUI for data upload.
Prerequisites:
- Prepare a CSV document containing the data that you want to upload. By default DocsNG uses , (comma) as list delimiter. If your regional settings have different delimiter, please follow the instructions in Custom List Delimiter Configuration in DocsNG.
- Ensure that the first row of the CSV file contains the data fields in the Data Model. Columns in the CSV file that do not match with any field in the data model will be automatically excluded during the import process.
- Make sure that dates in the CSV file are formatted in JSON date format. Please follow the instructions in Formating date values in JSON date format in MS Excel.
- To include relationship information during bulk data upload, make sure your CSV file contains the necessary relationship search field and value information. Detailed instructions on how to map these relationships can be found in the Bulk Upload Relationship Mapping section.
Special Characters:
If your data set contains special characters like "ö," "ü," "ç," "ı," etc., you should save your CSV file in UTF-8 data format to ensure proper inclusion of your data during the upload process. Follow these steps:
- In Excel, navigate to the "Save As" menu.
- Choose the "Save as type" option and select "CSV UTF-8."
- Save your CSV file with this format.
This ensures that special characters are correctly preserved during the upload process.
Uploading Data:
- Access the Data Upload Feature: Log in to DocsNG and navigate to the GUI. Find the data model to which you want to upload data. Under the data model's section, look for the upload button.
- Select and Upload CSV File: Click on the opened pop-up screen. A file dialog will open, allowing you to select the CSV file you prepared for data upload. Choose the appropriate file and confirm your selection.
- Initiate Import: You can start the import process by clicking OK button. DocsNG will begin processing the CSV file and importing the data into the selected Data Model.
- Review and Confirm: After the import process, it's essential to review the imported data for accuracy. Make sure that all the data points are correctly linked and that there are no errors in the uploaded information.
This feature simplifies the process of importing large volumes of data while ensuring that the data fields match those in your Data Model.
Custom List Delimiter Configuration in DocsNG
By default, DocsNG uses a comma (,) as the delimiter for lists. This means that when you would like to upload data using CSV files the data in the CSV file must be separated by commas. However, if your regional settings or specific requirements necessitate a different delimiter, you can easily configure this setting in DocsNG. Here's how to do it:
Prerequisites: - You must have an administrator role in DocsNG to access and modify server settings.
Configuration Steps:
-
Log In and Access Server Settings: Begin by logging in to DocsNG with your administrator credentials. Once logged in, navigate to the "Settings" menu. Here, you will find a sub-menu called "Server Settings."
-
Open Server Settings: Click on "Server Settings" to access the configuration options for your DocsNG instance.
-
Locate CSV Delimiter Settings: Within the Server Settings, find the configuration option for the list delimiter. It is typically labeled as "CSV Delimiter" or a similar term in your local language.
-
Update Delimiter: In the List Delimiter configuration, you can specify the character that should be used as the delimiter for lists in your documents. For example, if you want to use a semicolon (;) instead of the default comma (,), simply enter the semicolon character in the appropriate field.
-
Save and Apply Changes: After specifying the new list delimiter, remember to save your changes. This will apply the updated delimiter setting throughout your DocsNG instance.
By following these steps, you can customize the list delimiter in DocsNG to meet your specific requirements. This allows you to adapt DocsNG to your regional settings or any other preferences you may have regarding list separation in your documents.
Formating date values in JSON date format in MS Excel
Converting a normal date in Excel into JSON date format can be achieved using a simple formula or custom formatting. JSON date format typically follows the ISO 8601 standard, which represents dates and times in the following format: "YYYY-MM-DDTHH:mm:ss.sssZ".
Here's how you can convert a normal date in Excel to JSON date format using a formula:
Assuming that the normal date is in cell A1, you can use the following formula in another cell to convert it to JSON date format:
=TEXT(A1, "yyyy-mm-ddTHH:mm:ss.sssZ")
Explanation:
TEXT(A1, ...)is an Excel function that converts a value to text using a specified format."yyyy-mm-ddTHH:mm:ss.sssZ"is the desired JSON date format, where:- "yyyy" represents the year with four digits.
- "mm" represents the month with two digits.
- "dd" represents the day with two digits.
- "T" is a literal 'T' character.
- "HH" represents the hours in 24-hour format with two digits.
- "mm" represents the minutes with two digits.
- "ss" represents the seconds with two digits.
- "sss" represents the milliseconds with three digits.
- "Z" represents the time zone (UTC).
After entering this formula, the result will be a cell containing the date in the desired JSON date format.
Here's a quick example:
If cell A1 contains the date "10/15/2023 14:30," and you enter the formula in another cell, it will convert it to "2023-10-15T14:30:00.000Z," which is in the JSON date format.
Remember that the actual date format in Excel may vary depending on your regional settings. You can customize the formula accordingly to match your specific date format.
Let's consider a scenario where you have a date field in your data model named Birthday, and it's located in the B column of your Excel file. However, the data in your Excel file is in a standard date format. It's important to keep in mind that non-matching fields from CSV files are excluded during the import process. We will use this future to let excel convert the dates into JSON format for us. To address this, you can easily make the following adjustments in your excel file:
- Rename the header Birthday to BirthdayIn in the B column of your Excel file.
- Create a new column, let's say in the C column, and name it Birthday.
- In the data field of this new Birthday column, apply the following formula: =TEXT(B1, "yyyy-mm-ddTHH:mm:ss.sssZ"). This formula will convert the dates into the JSON format.
During the import process, the BirthdayIn column will be disregarded (since your data model does not have a column called BirthdayIn, and the data from the Birthday column will be imported into DocsNG database. Below is the representation of above example:
| BirthdayInput | Birthday |
|---|---|
| 8/20/1963 | =TEXT(B1, "yyyy-mm-ddTHH:mm:ss.sssZ") |
Bulk Upload Relationship Mapping
Data models can be linked to other data models, and you can include these relationships in your CSV file as follows:
- Relationships are established using a search function.
-
For each relationship to be created, you need two fields in the CSV file:
-
Name of the search column in the destination data model:
- The column header should be a combination of the ModelName and the text IdField. For instance, if you have a relationship with the Customer data model, the header should be CustomerIdField.
- The value in the column should match the exact name of the field in the data model. For instance, if you intend to search for the related data point based on the Name field in the Customer model, the data in this column must be Name.
-
Data point to search:
- The column header should be a combination of the ModelName and the Value from the preceding column. As an example, if your relationship involves the Customer data model, and you have Name as the value in your CSV, the column header should be CustomerName.
- The value within the column must precisely match the data in the data model. For example, if you wish to search for Hans Janssen within the Name field of the Customer Data model, the data in this column must be Hans Janssen.
-
For example, let's consider the following data models. Suppose we want to import data into the Invoice data model, which has relationships with the InvoiceItems and Customer data models. You can create these relationships while uploading the data. To do this, you can add the following fields in the Invoice CSV file as an example:
| CustomerIdField | CustomerName | InvoiceItemsIdField | InvoiceItemsDescription |
|---|---|---|---|
| Name | Hans Janssen | Description | Pizza |
The first two columns mentioned above will establish a relationship with the Customer data model, connecting to a data point where the Name field holds the value Hans Janssen. The second relationship will be formed with the InvoiceItems data model, linked to a data point where the Description field contains the value Pizza. In each data row, you should provide the corresponding values for the previously mentioned columns.
Adding Barcodes to Documents
Enhance Your Documents with Barcodes Using Microsoft Word and DocsNG
Elevate your document capabilities by seamlessly integrating barcodes with Microsoft Word and DocsNG. For comprehensive guidance to add barcodes to MS Word documents, refer to the related MSDN article on https://msdn.microsoft.com/en-us/library/cbc893c0-9683-416d-84c6-407a92451c19.
Barcodes play a crucial role in facilitating quick and accurate data capture. This guide will walk you through the steps to effortlessly integrate barcodes into documents generated by DocsNG.
Step 1: Open Your Template Document in MS Word
Begin by opening the Microsoft Word document where you wish to incorporate barcodes. Assuming you've generated your template following the steps in the related section Create a Template Using MS Word, proceed with the following prerequisites:
- A field in the Data model, e.g., AddressBarcode in the CustomerAddress data model.
- A placeholder in the template, including the merge field, e.g., CustomerAddress.AddressBarcode.
Step 2: Define a Location for the Barcode Placeholder
Identify the document location where you want the barcode to appear. Ensure that the barcode placeholder is between DocsNG Data Range placeholders, such as between RangeStart:CustomerAddress and RangeEnd:CustomerAddress placeholders.
Step 3: Press Ctrl + F9 to Generate a Placeholder
Press Ctrl + F9 to create a placeholder, represented as {}. This step is essential, as directly typing curly brackets {} won't produce the desired outcome.
Step 4: Set Barcode Parameters
Syntax:
{ DisplayBarcode "BarcodeData" BarcodeType [ switches ] }
- Type DisplayBarcode.
- BarcodeData must be between double quotes. To place a proper DocsNG placeholder, place the cursor between double quotes and insert new placeholder to fetch data from the DocsNG data model.
- Define the barcode type.
- Include any necessary switches such as size \s
Step 4: Update the Field Code
In the example below, <<CustomerAddress.AddressBarcode>> represents a placeholder that fetches data from DocsNG. So the data of the barcode placeholder is a DocsNG placeholder. Below placeholder generates a QR Code using the data from CustomerAddress.AddressBarcode with a size of 50.
{ DISPLAYBARCODE "<<CustomerAddress.AddressBarcode>>" QR \s 50 }
Step 5: Save Your Document and Upload as a Template to DocsNG
Once satisfied with the barcode placement and appearance, save your document. Upload it to DocsNG as a template for further use.
Congratulations! You've successfully added a placeholder for a barcode to your document, enhancing its functionality and visual appeal.
Supported Barcode Types
| Switch | Explanation |
|---|---|
| QR | A QR 2D bar code as specified by [ISO/IEC18004:2006]. |
| CODE128 | A Code 128 linear bar code as specified by [AIM-BC4-1995-Code128]. |
| CODE39 | A Code 39 linear bar code as specified by [AIM-BC1-1995-Code39]. |
| JPPOST | A Japanese Postal Service Customer barcode. JPPost is compliant with CBC (Customer Bar Code), which is also known as RM4SCC. |
| EAN8-EAN13 | An EAN - International Article Number worldwide bar code for product ID’s (8 digit/13 digit) as specified in [GS1-BARCODE]. |
| JAN8-JAN13 | A JAN: Japanese barcode for product ID’s (8 digit/13 digit). JAN8 is an alias of EAN8. JAN13 is an alias of EAN13. |
| UPCA-UPCE | A UPC (A&E): US barcode for product ID’s as specified in [GS1-BARCODE]. |
| ITF14 | An ITF-14 item-tracking barcode for shipping as specified in [GS1-BARCODE]. |
| NW7 | A NW-7 (CODABAR) serial number bar code as specified by [AIM-BC3-1995-Codabar]. |
| CASE | USPS barcode – FIM/POSTNET (*2) - barcode for tracking USPS mail. CASE is an alias of ITF14. |
PAdES LTV Digital Signatures and PDF Encryption
DocsNG offers digital signature capabilities based on PAdES, including support for Long Term Validation. Following is the primary standard for digital signatures within DocsNG:
Signatures with Password-Protected PFX Files: - DocsNG allows users to apply advanced digital signatures to their documents. These signatures are generated using a certificate stored in a password-protected PFX file. - To utilize this method, users can upload their certificate in a PFX file, which is protected with a password, to their DocsNG profile. During the document generation process, users simply enter the password for the PFX file to digitally sign the output document.
Digital signatures play a vital role in ensuring document integrity, authenticity, and security. With PAdES compliance and options for both advanced and qualified signatures, DocsNG provides users with the tools they need to sign their documents with confidence and meet the highest standards of security and compliance.
How to add PAdES LTV Advanced Digital Signatures to the generated documents
In two simple steps you can add advanced digital signatures to your documents:
The sole requirement for this process is that you possess a valid signing certificate stored in a password-protected pfx file. Many certificate authorities issue signing certificates in this format.
-
Step 1: Access the system using administrator credentials and navigate to the Settings menu. From there, select the Server Settings sub-menu to configure the following server settings:
-
Timestamp server: The server configured in this setting will be used for all timestamping activities. You have the option to select from the following public timestamp servers or utilize a commercial timestamp server of your preference. Keep in mind that the response time of public servers can fluctuate based on their current server load.
- http://timestamp.sectigo.com/qualified (EU Qualified)
- http://timestamp.sectigo.com (in Adobe Approved Trust List)
- http://timestamp.digicert.com (in Adobe Approved Trust List)
-
Signature Visibility: You have the option to determine whether you want your signatures to be visible on the document. Visible signatures are always positioned on the first page of the document. However, you can specify the coordinates and size of the signature field as follows:
-
Signature Field Location and Size: When configuring the signature field, you have the option to define its location and dimensions using four parameters:
- Left: This parameter specifies the position of the signature field from the left side of the document.
- Bottom: It determines the position of the signature field from the bottom side of the document.
- Width: This parameter controls the width of the signature field.
- Height: It specifies the height of the signature field.
By adjusting these parameters, you can precisely set the location and size of the signature field within your document.
-
-
-
Step 2: Access the system using the credentials of the user that the certificate (in the password protected pfx file) blongs to and navigate to the Settings menu. From there, select the Account sub-menu to configure the following user settings:
- Check Use Advanced Signature check box.
- Click + button to upload the pfx file.
- Click Save button to save the settings
Applying PAdES LTV Advanced Signatures
Once the configuration steps mentioned above are complete, you can easily add PAdES LTV Advanced signatures to your documents. Simply enter the PFX password into the Advanced Signature Password field during the document generation process, whether you're using the GUI or the API (the related parameter in the API is "pfxPwd").